GoMed User Guide
The complete guide, one chapter per app. Back to the index
- Signing in and finding your way
- Patients & Registration
- Appointments, Queue & Teleconsultation
- Practitioners, Departments & Services
- Payers, Plans & Memberships
- Patient Documents & Photo
- Patient Card & Verified Documents
- SMS Messages
- Visits (EMR)
- Specialty Forms & Clinical Flags
- Prescriptions & Orders
- Certificates & Consents
- Vaccinations
- Emergency Department
- Admissions & Bed Board
- Nursing Station & Barcode eMAR
- Intensive Care Charting
- Operation Theatre
- Dental Charting
- Physiotherapy
- Laboratory & Specimens
- Radiology
- Pharmacy & Dispensing
- Blood Bank
- Dialysis
- Bills, Charges & Cashier
- Desk Payments (POS)
- Pre-authorisation, Claims & Doctor Fees
- Medical Records, Coding & Registers
- Quality & Incidents
- Ambulance, Diet, Housekeeping, CSSD & Mortuary
- Patient Portal
- Mobile App (patients and staff)
- Hospital Website
- WhatsApp Assistant
- Help Desk
- Staff, Roster, Attendance & Payroll
- Purchasing, Stock & Maintenance
- Settings, Roles & Users
- Dashboards, Reports & AI Assistant
Signing in and finding your way
GoMed is one system with one login. Every app opens on its own dashboard; the app drawer groups them the way the hospital is organised; every record carries a chatter for messages, followers and scheduled activities. Arabic and English switch per user.
Where:https://<your-hospital>.gomed.goliveict.com
How to
Sign in
- Open the hospital’s address in Chrome, Edge, Safari or Firefox.
- Enter the e-mail and password your administrator gave you.
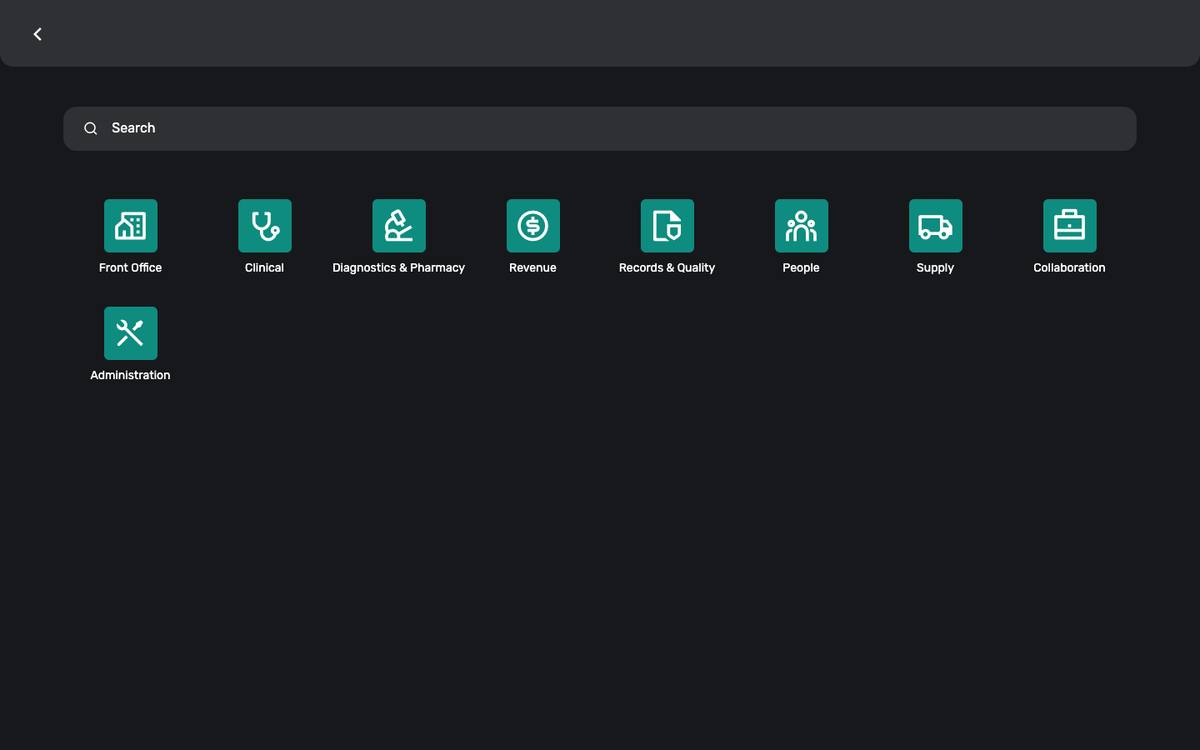
- The first screen is the dashboard of your main app; the grid icon top-left opens the app drawer.
Move between apps
- Click the grid icon top-left.
- Apps are grouped: Front Office, Clinical, Diagnostics & Pharmacy, Revenue, Records & Quality, People, Supply, Collaboration, Administration.
- Click an app; its menu appears across the top.
Read a dashboard
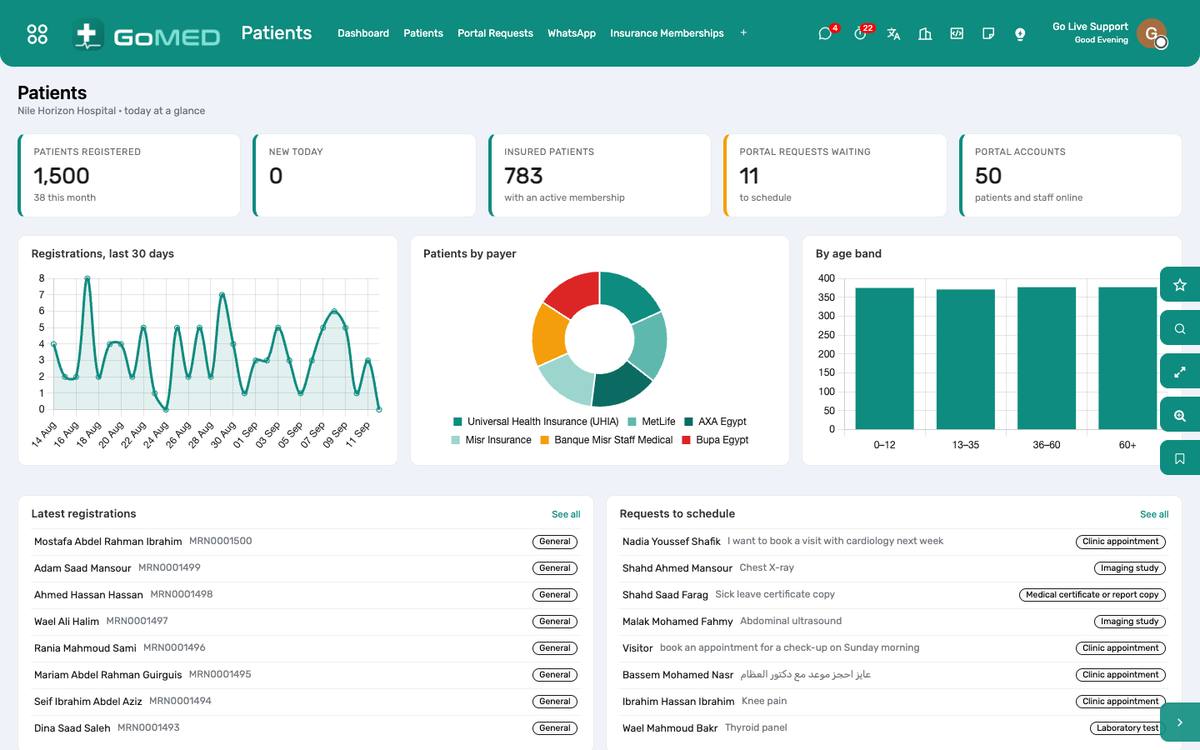
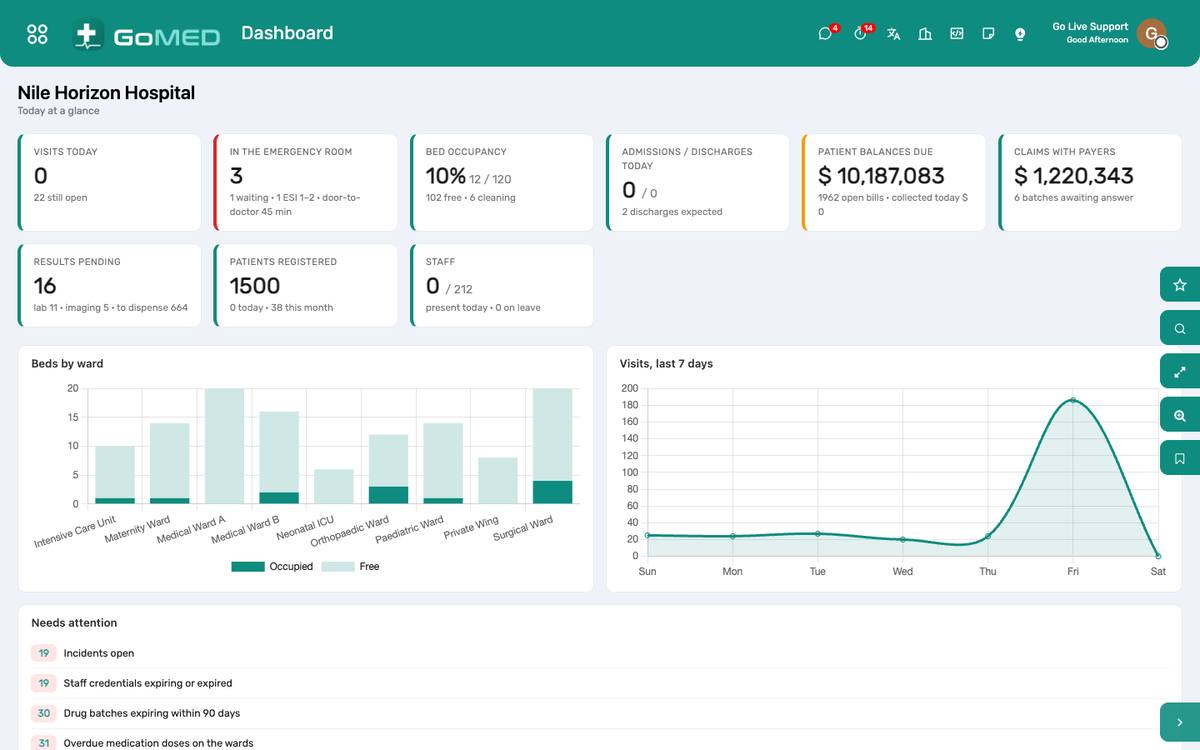
- Numbers of the day are at the top, charts of the fortnight beneath, and the records needing attention at the bottom.
- Click any card to open the list it counts.
- Use the date filter on the right of the dashboard to look at another period.
Search, filter and group a list
- Type in the search box at the top of any list; choose which field to search from the dropdown that appears.
- Open the filter panel (funnel icon) for saved filters such as “Today”, “Mine” or “Overdue”.
- Group by a field to see totals per practitioner, department or payer.
- Save a filter you use daily: Favourites › Save current search.
Use the chatter, followers and activities
- Every record — a patient, a visit, a claim, a ticket — has a chatter under or beside the form.
- “Send message” reaches the followers by e-mail and in Discuss; “Log note” stays internal.
- “Activities” schedules a call, a to-do or a review with a deadline for a colleague; it appears in their inbox and on the activity view of the list.
- Attach files with the paper-clip; they stay on the record.
Switch to Arabic
- Click your name top-right › My Profile.
- Set Language to Arabic; save.
- Reload: menus, fields and reports are in Arabic, right-to-left.
Print a document
- On a record, open Print (the printer icon or the ⚙ menu) and choose the report.
- A PDF opens in a new tab; the browser prints or saves it.
- Set the paper size for cards and labels under Settings › Technical › Paper Formats only if the printer needs a different one.
Questions the desk asks
Two people opened the same record — whose change wins?
The last save wins, but the chatter records both. Refresh before editing a record someone else is likely to be on.
Can I undo an archive?
Yes: filter the list on Archived, open the record and Unarchive.
Patients & Registration
One record per human being, with a permanent medical record number (MRN). Everything else — visits, results, bills, admissions — hangs off it. Registration takes a minute; the wristband barcode, the photo and the insurance membership are set here and used everywhere.
Where:Patients › Patients
Before you start
- MRN format
- The sequence and prefix are under Patients › Configuration › Settings. Set them before the first patient; they never change afterwards.
- Departments and specialties
- Under Patients › Configuration. Every practitioner and every visit belongs to a department.
- Allergies and diagnoses
- The allergy list and the ICD-10 catalogue ship loaded; add local entries under Configuration.
How to
Register a new patient
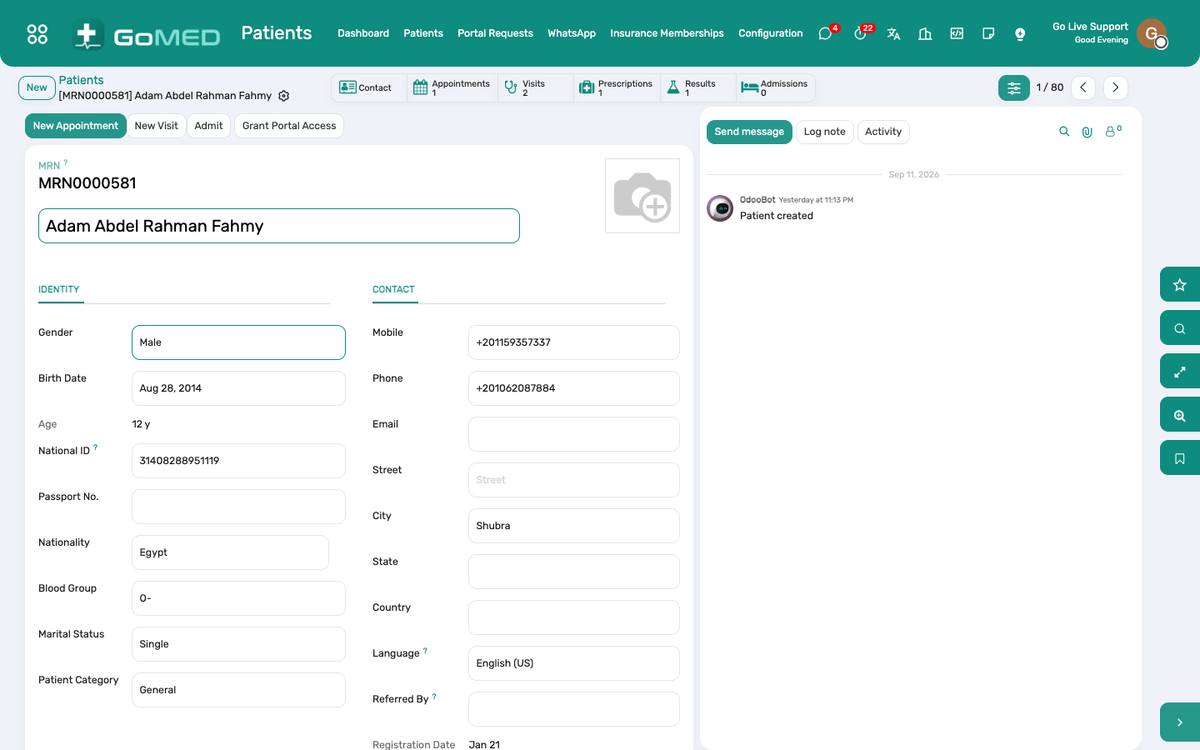
- Patients › Patients › New.
- Type the name; the system warns if a patient with the same name and birth date exists — open that one instead of creating a duplicate.
- Fill birth date, gender, phone, national ID; the MRN is assigned on save.
- Add the insurance membership on the Insurance tab (payer, plan, member number, validity) so the cashier sees the coverage.
- Click Camera to take the photo with the webcam, or upload one.
- Save. The wristband code is printed on the identification band from Print › Wristband.
Find a returning patient
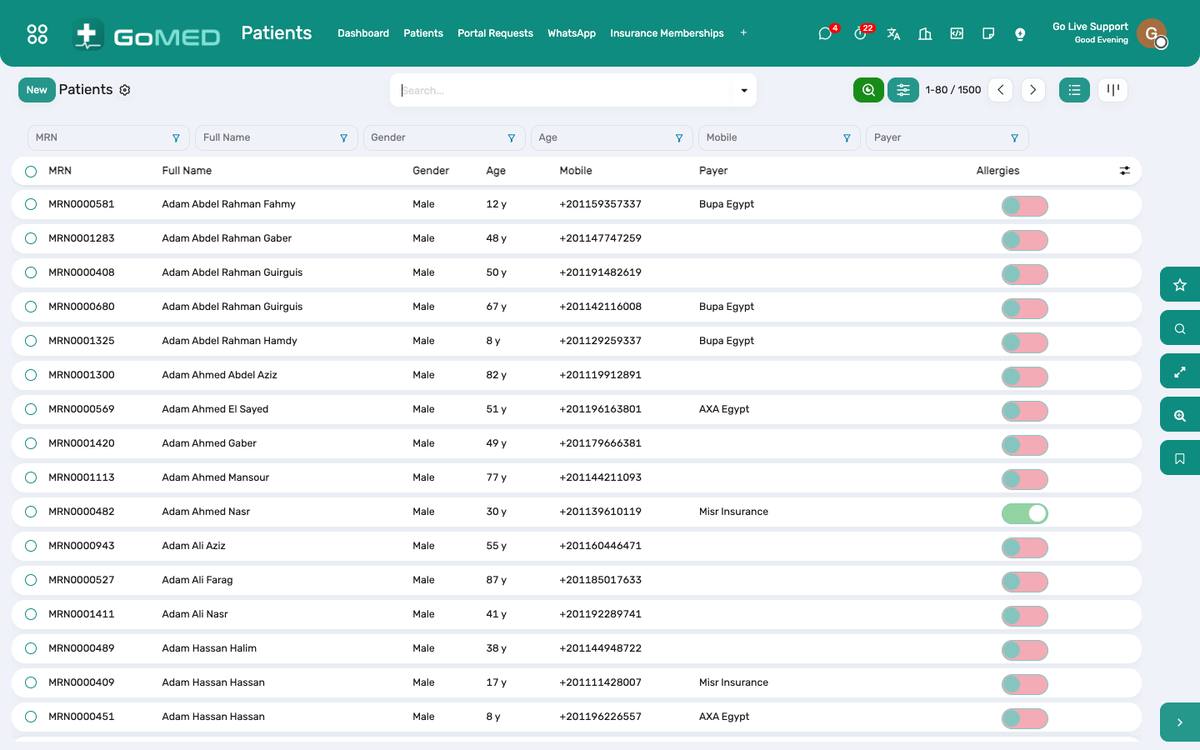
- In the Patients list, type the phone number, the national ID or the MRN in the search box.
- Or scan the wristband or the patient card: the barcode reader types the code and the record opens.
- Check the photo and the birth date before opening a visit.
Record allergies, chronic conditions and alerts
- On the patient form, Clinical tab: add each allergy with its reaction and severity.
- Add chronic conditions from the ICD-10 catalogue.
- Tick VIP, Staff or another category if it should be visible on every screen; it appears as a coloured badge on the visit, the bed board and the pharmacy queue.
Merge a duplicate
- Open the record to keep; ⚙ › Merge patients.
- Choose the duplicate; the visits, bills and documents move to the kept record and the duplicate is archived with a note.
- Only a medical-records user can merge; the action is logged in the chatter of both.
Mark a patient deceased
- Medical Records › Deaths › New, or from the admission’s Discharge as deceased.
- Once a death notification is issued the patient file is flagged deceased, the patient card is revoked and no new visit can be opened.
Give a patient portal access
- On the patient form, Portal tab › Grant portal access; the patient needs an e-mail address.
- The invitation e-mail carries the link to set a password.
- The same login works on the mobile app at /app.
Questions the desk asks
Can the MRN be changed?
No. It is the one identifier that never changes; corrections go through a merge.
Where is the wristband printed?
Print › Wristband on the patient, or from the admission. The code is the MRN prefixed WB; a scanner reads it at the bedside.
See also: Patient Documents & Photo Patient Card & Verified Documents Payers, Plans & Memberships Appointments, Queue & Teleconsultation
Appointments, Queue & Teleconsultation
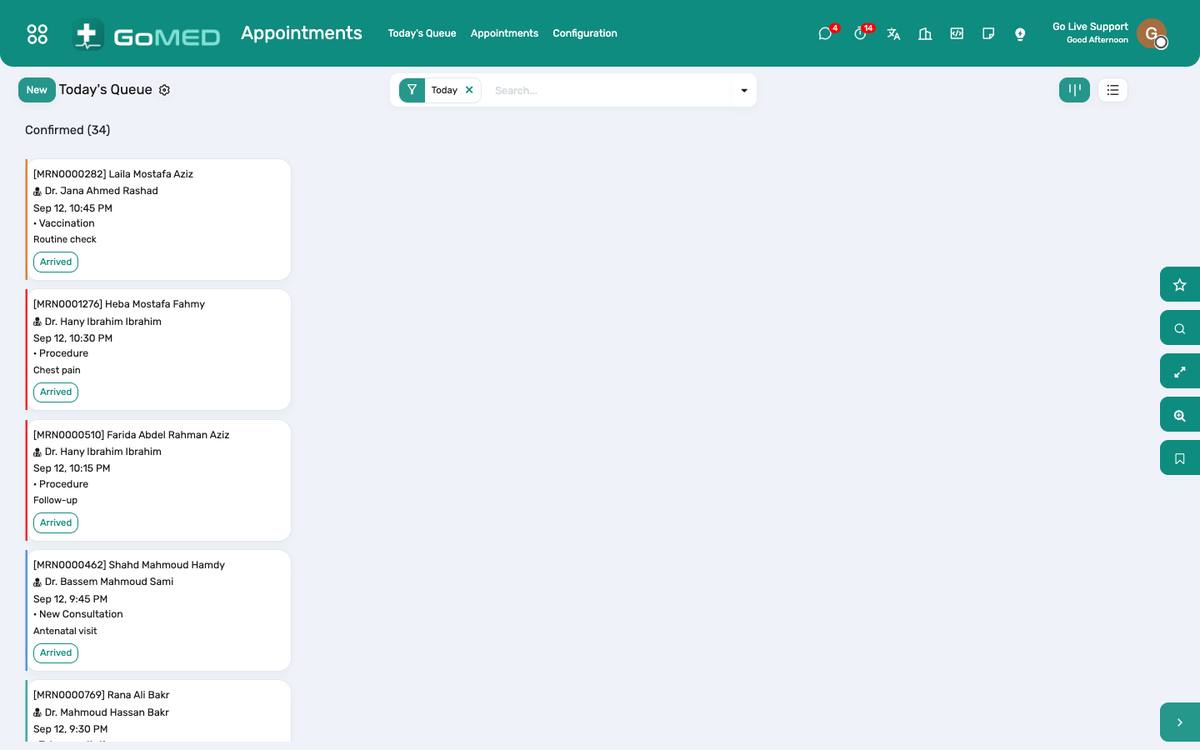
Booking against each practitioner’s schedule, walk-ins, arrival tokens, a live queue for reception and a corridor screen for the waiting room. A teleconsultation type gives the visit a video room instead of a token.
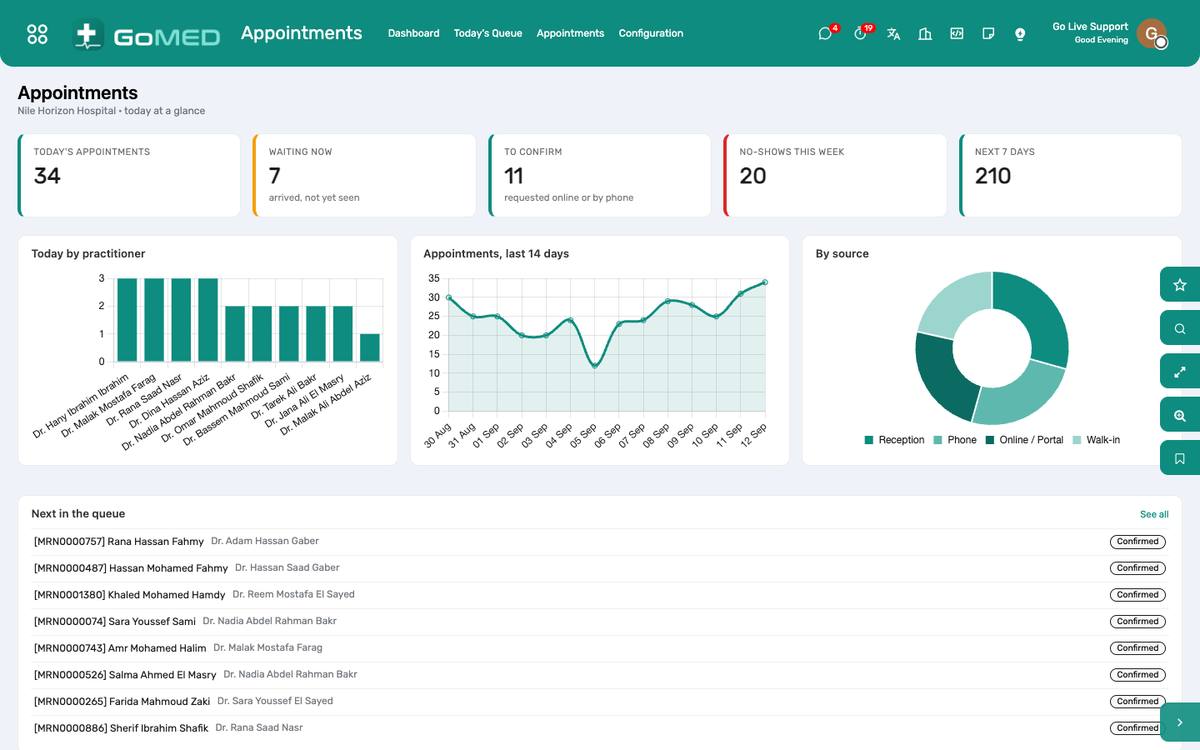
Where:Appointments › Appointments · Today’s Queue · Waiting Room Screen
Before you start
- Schedules
- Appointments › Schedules: for each practitioner, the weekdays, hours and slot length. Booking offers only the free slots.
- Appointment types
- Appointments › Configuration › Appointment Types: consultation, follow-up, procedure, vaccination, teleconsultation. Tick “Teleconsultation” on the video type.
- Video server
- Patients › Configuration › Settings › Video meeting server. The public Jitsi server works out of the box; a hospital with its own server points it there.
- Corridor screen
- Open /queue on the waiting-room television; add /<department id> to show one department only.
How to
Book an appointment
- Appointments › Appointments › New (or from the patient form › Appointments).
- Choose the patient, the practitioner and the type; the calendar shows the free slots of that practitioner’s schedule.
- Pick the slot; save. The patient receives an SMS confirmation if SMS is switched on.
- State becomes Confirmed.
Register a walk-in
- Appointments › Today’s Queue › Walk-in.
- Choose the patient (or register a new one) and the practitioner; the appointment is created at the current time and marked Arrived with the next token.
Arrive a patient and run the queue
- When the patient reports to the desk, open the appointment and click Arrive: the token is assigned and printed on the ticket.
- Today’s Queue lists the arrived patients per practitioner in token order with the estimated wait.
- The practitioner clicks Start consultation from the queue or the appointment; the visit opens with the history loaded.
- No-show marks the ones who never came; the dashboard counts them per practitioner.
Reschedule or cancel
- Open the appointment; change the date or the slot and save, or click Cancel and give the reason.
- The patient gets a new confirmation (SMS) when the slot changes.
Hold a teleconsultation
- Book the appointment with the Teleconsultation type; a video room is created automatically.
- The patient sees the “Join the video visit” button on the portal and in the app from a few minutes before the time.
- The practitioner opens the appointment and clicks Join video; the visit starts and the room opens in a new tab.
- Document the visit as usual; there is no token and no waiting room for video visits.
Put the queue on the corridor screen
- Open the television’s browser at https://<hospital>/queue (or /queue/<department id>).
- The screen shows, per practitioner, the token now serving and the next ones; it refreshes every 15 seconds and needs no login.
- The patient sees the same information on the portal under Today, with their own token and the estimated wait.
Questions the desk asks
The patient wants a specific doctor who has no schedule that day.
Book on another day, or add a one-off slot under Appointments › Schedules; a booking outside the schedule is refused on purpose.
Where do online booking requests go?
Patient Portal › Portal Requests. Reception converts each into a confirmed appointment; the patient sees the status on the portal.
See also: Patients & Registration SMS Messages Patient Portal Visits (EMR)
Practitioners, Departments & Services
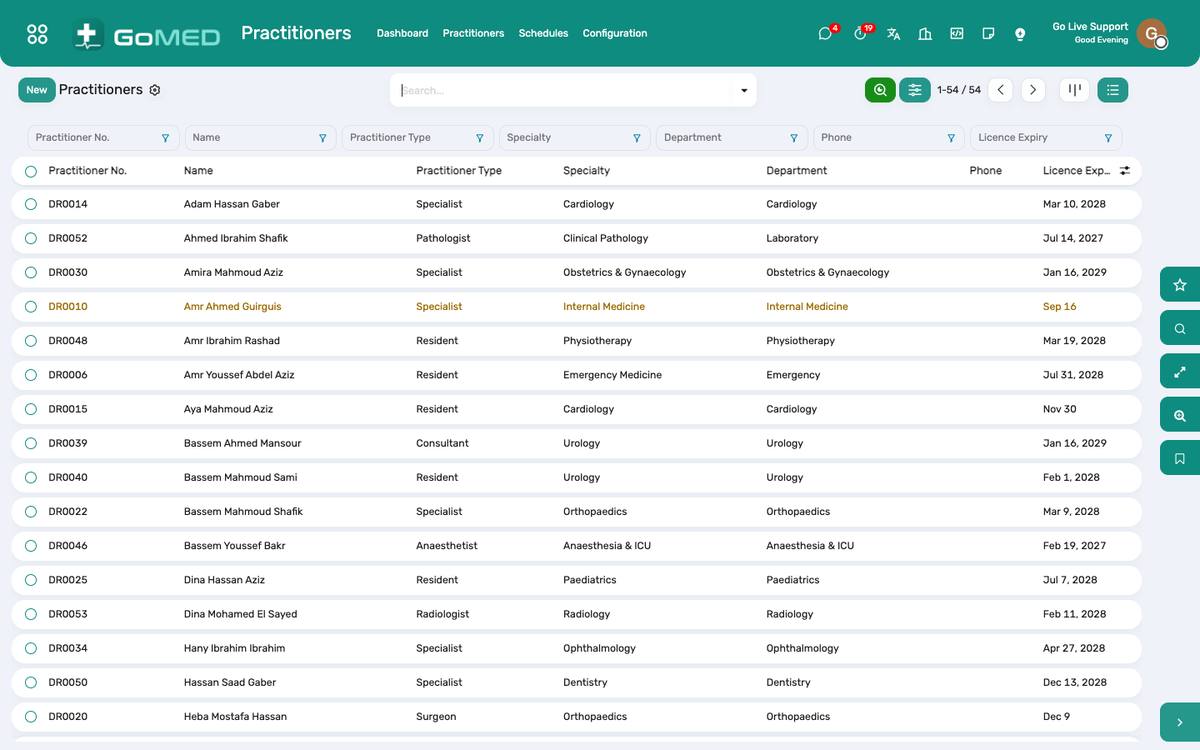
Every doctor, nurse and technician who acts on a record is a practitioner: a specialty, a department, a licence, a consultation fee and a login. The service catalogue is the price list every department bills from.
Where:Practitioners › Practitioners · Patients › Configuration › Departments · Service Catalogue
How to
Add a practitioner
- Practitioners › Practitioners › New.
- Name, specialty, department, licence number and expiry, phone.
- Choose the consultation service (the fee the desk charges for a visit with this practitioner).
- Link the user account so “My visits” and the doctor fee statement work: field User.
- Add the weekly schedule under Appointments › Schedules.
Create or retire a department
- Patients › Configuration › Departments › New; give it a code (used on reports and the queue screen) and a manager.
- Archive a department that closes; its history stays.
Maintain the service catalogue
- Patients › Configuration › Service Catalogue.
- Each service has a category, a kind (consultation, procedure, lab, radiology, bed, surgery), the standard price and the product it posts to in accounting.
- Payer tariffs are set on the payer’s pricelist under Insurance, not here.
- A service used by the laboratory or radiology is linked from its test or exam, so ordering it charges it.
Track licences and credentials
- Practitioners › Credentials: licence, board certification, BLS/ACLS, with expiry dates.
- The dashboard lists credentials expiring in 60 days; an activity is raised for HR.
See also: Appointments, Queue & Teleconsultation Bills, Charges & Cashier Staff, Roster, Attendance & Payroll
Payers, Plans & Memberships
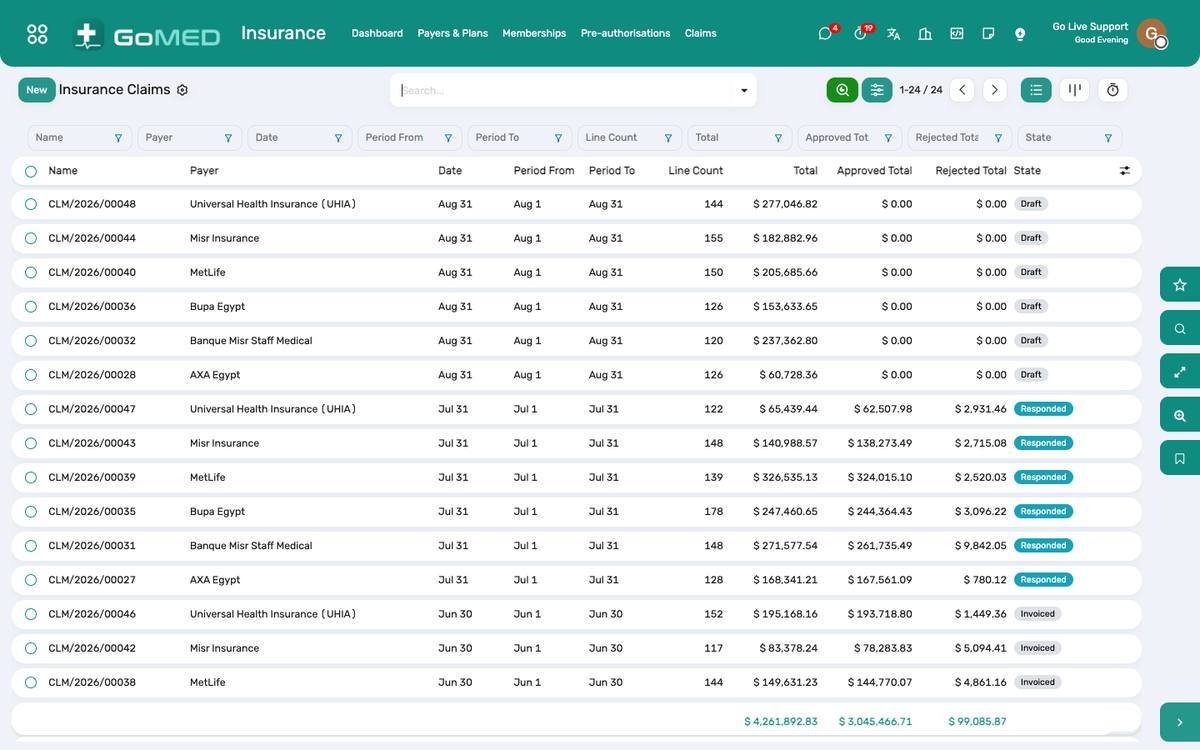
Who pays for what: payers (insurers, TPAs, companies, the national scheme), their plans with coverage rules and co-payments, and each patient’s membership with a member number and validity. The bill splits itself between payer and patient from these rules.
Where:Insurance › Payers & Plans · Memberships
How to
Add a payer and a plan
- Insurance › Payers & Plans › New payer: name, type, contact, contract dates, pricelist (the tariff).
- Add plans under the payer: coverage percentage, co-payment, the services excluded, whether pre-authorisation is required and above what amount.
Attach a membership to a patient
- On the patient form › Insurance tab › Add: payer, plan, member number, valid from/to, the card scan under Documents.
- One patient can hold several memberships; the one marked primary is proposed on new visits.
Check coverage at the desk
- Open the visit; the Payer field shows the membership used and its validity.
- An expired membership is red; switch the visit to self-pay or to another membership before charging.
See also: Patients & Registration Bills, Charges & Cashier Pre-authorisation, Claims & Doctor Fees
Patient Documents & Photo
The patient’s papers — national ID, insurance card, pre-authorisation letter, referral, external reports and imaging, signed consents — each typed, dated and attached to the file. Documents that expire warn before they do.
Where:Medical Records › Patient Documents · on the patient: Documents
Before you start
- Document types
- Patients › Configuration › Document Types. Tick “requires expiry” for IDs, cards and letters, and set how many days before expiry the warning starts.
How to
Attach a document
- Open the patient › Documents › New.
- Choose the type, name it (“Insurance card — front”), upload the scan or photo, enter the reference (policy or ID number), the issue and expiry dates.
- Save. The file shows on the patient’s document count; expired or expiring documents show a warning at the top of the patient form.
Take the patient’s photo at the desk
- On the patient form, click Camera beside the photo.
- Allow the browser to use the webcam the first time; look at the camera; Capture.
- The picture is cropped square and saved on the file; it prints on the patient card and the wristband.
- On a phone, the same button opens the phone camera.
Work the expiry list
- Medical Records › Patient Documents › filter Expiring soon or Expired; group by type.
- Call the patient to bring the renewed card; upload the new one and archive the old.
- The daily check also raises an activity for the person who uploaded each expiring document.
See also: Patients & Registration Payers, Plans & Memberships Patient Card & Verified Documents
Patient Card & Verified Documents
A patient card with the hospital’s band, the file number, the photo and a QR. Certificates and birth and death notifications carry the same QR. Anyone who scans it reaches a public page that says whether the document is still valid — and nothing else.
Where:on the patient: Issue card · Medical Records › Issued Documents
Before you start
- Card colour
- Patients › Configuration › Settings › Identity & Legal Documents: the colour of the band, and whether Hijri dates print beside the Gregorian ones.
- Card printer
- The card report is 86 × 54 mm (CR80). Print on a card printer or on adhesive card stock.
How to
Issue and print a patient card
- On the patient form click Issue card; a verification number and QR are created.
- Print card opens the PDF: band, hospital name, photo, name, MRN, sex and age, the QR and “scan to verify”.
- Re-issuing a card (lost, damaged) revokes the previous one: the old QR answers “not valid” from that moment.
Verify a document someone presents
- Scan the QR with any phone camera; the page at /verify/<code> opens.
- It shows the facility, the kind of document, the name it was issued to, its number and the date — and Valid or Not valid.
- No clinical data is on the page, so it can be shown to an employer, a school or a registry office.
Revoke a card
- On the patient form, Revoke card and give the reason.
- A card is revoked automatically when the patient is archived or marked deceased.
See everything the hospital has issued
- Medical Records › Issued Documents lists every card, certificate and notification with its number, the subject, who issued it, how many times it was scanned and whether it is still valid.
- Revoke from the list if a paper was issued in error.
See also: Patients & Registration Certificates & Consents Medical Records, Coding & Registers
SMS Messages
Confirmations when an appointment is booked, a reminder the day before, “your turn is near” from the queue, and “results ready” from the laboratory and radiology — in Arabic or English by the patient’s language, through any HTTP SMS gateway. A patient can opt out.
Where:Appointments › SMS Messages · Configuration › SMS Templates
Before you start
- Gateway
- Patients › Configuration › Settings › SMS gateway: switch on, then paste the provider’s send URL, method, headers and body from its documentation, with {to}, {text} and {sender} where the number, the message and the sender go. Off, messages are composed and logged as simulated.
- Country code
- Prefixed to local numbers that start with 0.
- Templates
- Four ship; edit the wording and the Arabic body under SMS Templates.
How to
Send a message by hand
- Appointments › SMS Messages › New: patient, template or free text; Send.
- Or from a patient, ⚙ › Send SMS.
Read the log and retry a failure
- SMS Messages lists every message with its status: queued, sent, failed, skipped (opted out), simulated.
- Open a failed one to read the gateway’s error; fix the number or the gateway and click Retry.
Opt a patient out
- On the patient form tick “No SMS”. Messages for that patient are logged as skipped and never sent.
Questions the desk asks
Reminders did not go out.
Check the “GoMed SMS: appointment reminders” scheduled action is active under Settings › Technical › Scheduled Actions, and that the gateway is on.
See also: Appointments, Queue & Teleconsultation WhatsApp Assistant Laboratory & Specimens
Visits (EMR)
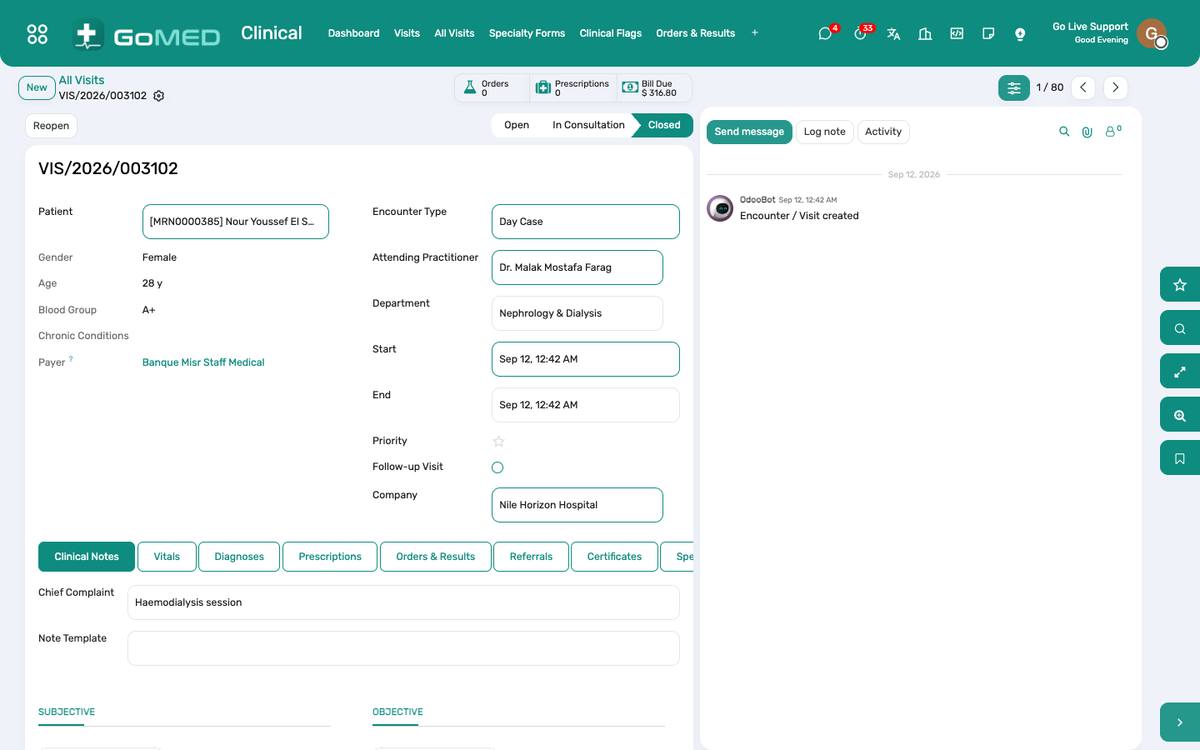
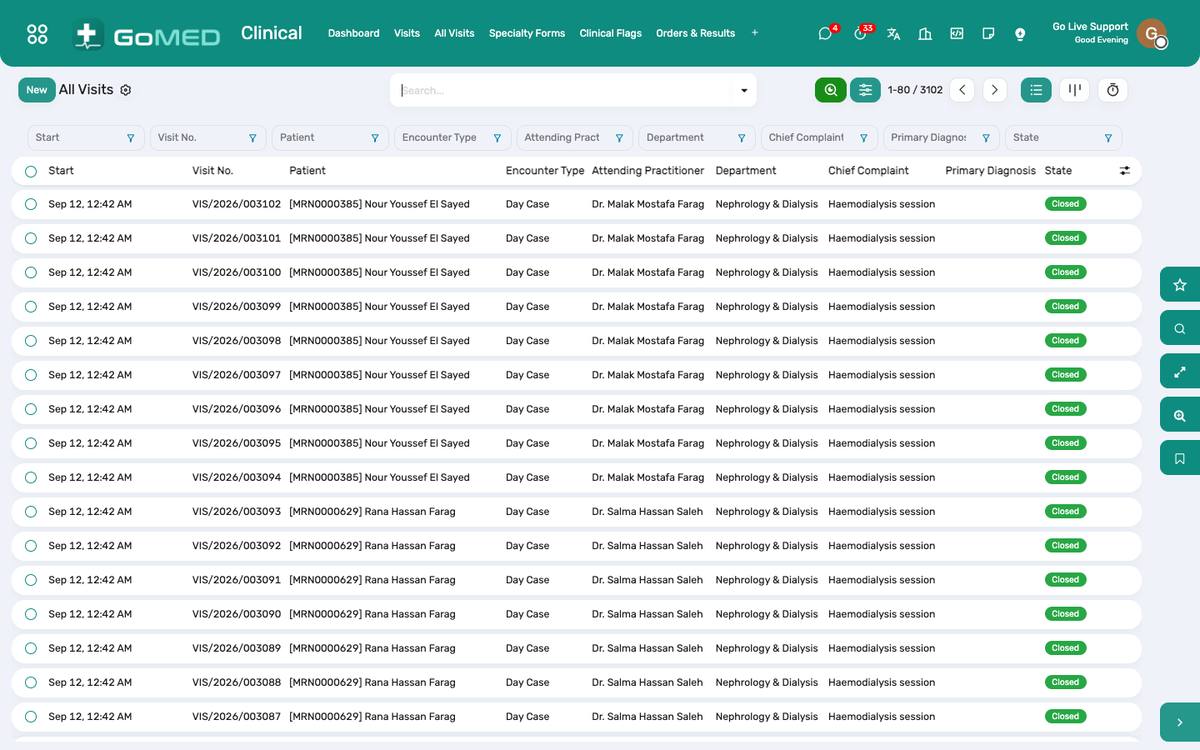
The electronic medical record. A visit (encounter) is one contact — outpatient, emergency or inpatient — with vitals, complaint, history, examination, diagnoses coded in ICD-10, orders, prescriptions, referrals and a signed note. The patient’s whole history is one click away from the visit.
Where:Clinical › Visits · All Visits · Vital Signs
Before you start
- Note templates
- Clinical › Configuration › Note Templates: SOAP templates per specialty that pre-fill the note.
- Specialty forms
- Structured forms per specialty — see the Specialty Forms chapter.
How to
Start a visit from the queue
- Appointments › Today’s Queue › Start consultation on the arrived patient (or on the appointment itself).
- The visit opens in state In progress with the patient’s allergies, chronic conditions, last visits and open results in the side panel.
- A walk-in without an appointment: Clinical › Visits › New, choose the patient and the department.
Record vital signs
- On the visit, Vital Signs › Add: respiratory rate, saturation, oxygen, blood pressure, pulse, temperature, consciousness, weight, height.
- NEWS2 is computed the moment all seven parameters are in; an incomplete set shows “not scored” with what is missing.
- A medium or high score shows the response the score calls for; on an admitted patient it also raises an activity for the ward nurse.
Document the consultation
- Chief complaint, history, examination; pick a note template if one fits.
- Add diagnoses from the ICD-10 catalogue; mark one as principal.
- Orders tab: laboratory tests, imaging, procedures and nursing orders — each becomes a request in that department’s queue.
- Prescription: see the Prescriptions chapter.
- Follow-up date and instructions print on the visit summary the patient takes home.
Refer to another practitioner or department
- Clinical › Referrals › New from the visit: target department or practitioner, urgency, the reason.
- The receiving department sees it under its Referrals; accepting it books the appointment.
Close and sign the visit
- Click Done. The visit is signed with your name and time and can no longer be edited; an addendum goes in the chatter.
- The charges captured during the visit are on the patient’s bill at the cashier.
- Undo is available to a clinical manager only, and is logged.
Read a patient’s history
- From any visit, the side panel lists previous visits, admissions, results and prescriptions; click any of them.
- The patient form › smart buttons open every part of the record: Visits, Results, Prescriptions, Admissions, Bills, Documents.
Questions the desk asks
A flag appeared on the visit — what is it?
A clinical rule found a measurement past a threshold. It names the measurement; it never diagnoses or blocks care. See Specialty Forms & Clinical Flags.
See also: Specialty Forms & Clinical Flags Prescriptions & Orders Certificates & Consents Appointments, Queue & Teleconsultation
Specialty Forms & Clinical Flags
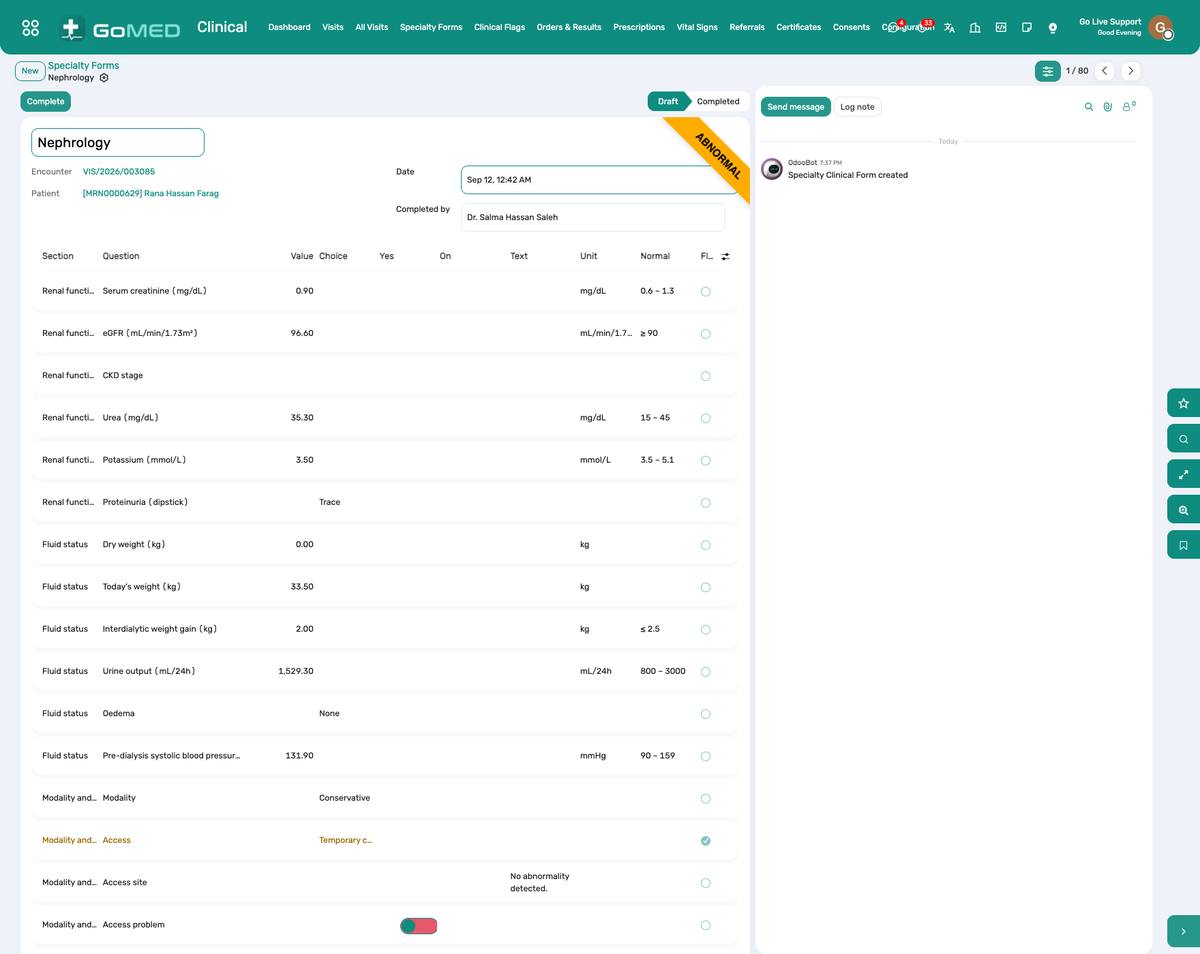
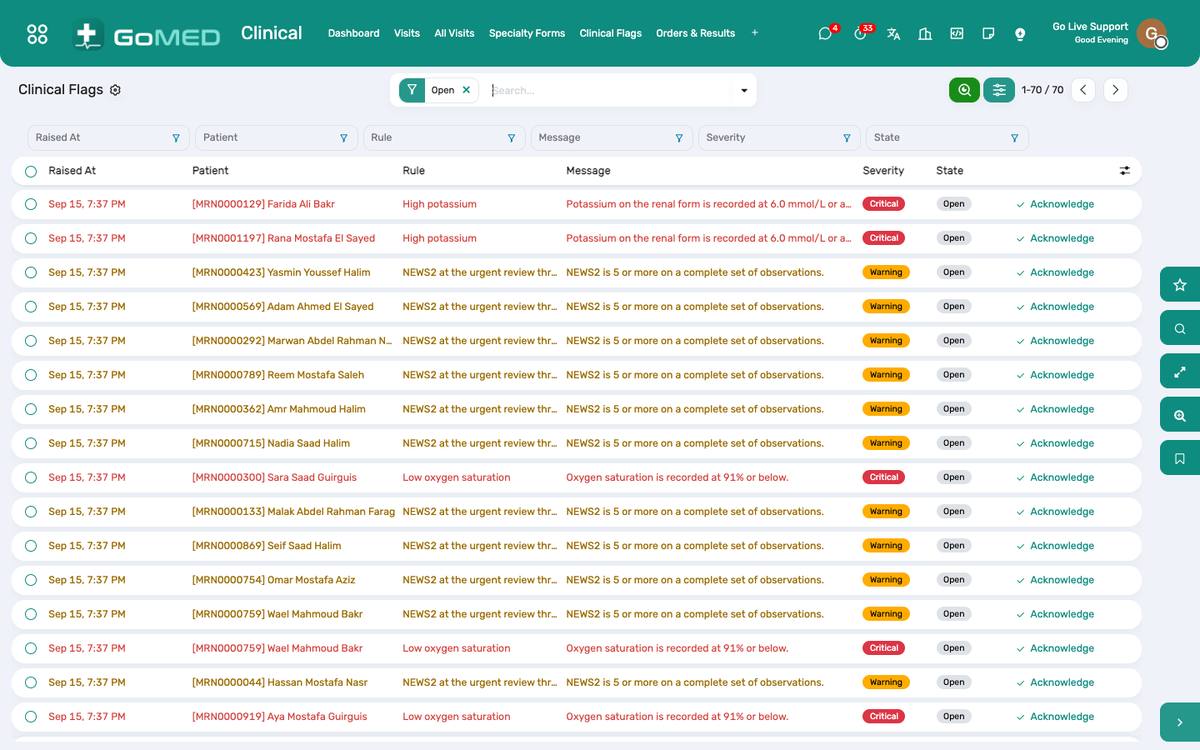
Eight specialties ship with the structured consultation form their clinicians use — obstetrics and gynaecology, ENT, ophthalmology, paediatrics, cardiology, oncology, nephrology, nutrition — with units, reference ranges that flag themselves and scores where the specialty uses one. Rules read the answers and the observation chart and raise a flag on the visit when a threshold is crossed.
Where:on the visit: Specialty Form · Clinical › Configuration › Specialty Form Templates · Clinical Flag Rules
How to
Fill a specialty form on a visit
- On the visit, Specialty Form › choose the template (the visit’s department proposes one).
- Answer the questions; a value outside its reference range is highlighted as you type.
- Scores (NYHA, ECOG, malnutrition risk…) are computed at the bottom with their band.
- Save; the answers are stored one per question, so they can be reported on across visits.
Build a form for a ninth specialty
- Clinical › Configuration › Specialty Form Templates › New: name, specialty, department.
- Add sections, then questions: type (number, choice, yes/no, text, date), unit, reference range, whether it counts towards the score.
- For a score, add the bands (from–to → label).
- Activate; it appears on visits of that department.
Acknowledge a clinical flag
- A flag shows as a banner on the visit and under Clinical › Clinical Flags.
- Read what was measured and the threshold; act clinically as you judge.
- Click Acknowledge and add a note; the flag stays on the record with your name and time.
- A flag whose condition is no longer met is marked so automatically.
Write a clinical flag rule
- Clinical › Configuration › Clinical Flag Rules › New: code, name, severity, the message the clinician sees, the advice.
- Conditions: a source (an observation field, a specialty question or age/gender), an operator and a value. Group 0 conditions must all match; any other group number is “one of”.
- Limit the rule to a sex or an age band if needed; activate it. It runs on every new observation or form answer.
See also: Visits (EMR) Nursing Station & Barcode eMAR
Prescriptions & Orders
e-Prescriptions from the medicine master with dose, route, frequency and duration, checked against the patient’s allergies before signing, sent to the pharmacy queue and — for inpatients — to the ward’s medication schedule. A prescription has a validity window; the pharmacy refuses one that has lapsed.
Where:Clinical › Prescriptions · Orders & Results
Before you start
- Validity
- Patients › Configuration › Settings › Prescription validity (days). Twelve months is the common default; 0 never expires.
- Medicine master
- Pharmacy › Medicines: generic, form, strength, high-alert flag, barcode.
How to
Write a prescription
- On the visit, Prescription › New (or Clinical › Prescriptions › New).
- Add lines: medicine, dose, route, frequency, duration, instructions; the quantity computes itself.
- An allergy match is refused with the allergy named; a high-alert medicine is marked.
- Sign. The prescription is printed for the patient and appears in Pharmacy › To Dispense.
Prescribe for an admitted patient
- From the admission or the ward visit, Prescription › New; tick Inpatient.
- The frequency generates the doses on the ward’s Medication Administration record (eMAR) for the nurse to give.
- Stop or change a line: the remaining doses are cancelled and re-generated.
Order tests, studies and procedures
- On the visit, Orders › Add: laboratory test or panel, imaging exam, procedure or nursing order, with the clinical indication and urgency.
- Each order becomes a request in the laboratory, radiology or nursing queue, charged to the visit.
- Results return to the same Orders & Results tab with abnormal and critical flags; critical values also notify you.
Renew or repeat a prescription
- Open the previous prescription › Repeat; a new visit is required if the previous one is signed.
- An expired prescription shows a red banner; the patient needs a new one, not a renewal.
See also: Pharmacy & Dispensing Nursing Station & Barcode eMAR Laboratory & Specimens Radiology
Certificates & Consents
Sick-leave, fitness, attendance and medical-report certificates issued from the visit, numbered, printed with a QR an employer can verify; and consents — to treatment, surgery, anaesthesia, transfusion, contrast, data sharing — recorded on paper or signed by the patient on the portal or the app.
Where:Clinical › Certificates · Consents
How to
Issue a certificate
- On the visit, Certificates › New: type, dates (for sick leave: from, to, days), the diagnosis text as it should print.
- Issue: the certificate gets a number and a QR. Print; the QR opens the public verification page.
- Cancel with a reason if it was issued in error; the QR then answers “not valid”.
Record a consent signed on paper
- On the visit, Consents › New: type, description, who signed and their relation, the witness; attach the scanned form.
- Tick Signed. The consent is listed on the visit and the surgery.
Ask the patient to sign online
- Create the consent and tick “Show on the portal”.
- The patient sees it under Consents on the portal and in the app, reads the text and draws a signature on the screen.
- The record shows the signature, the time, the IP and the channel; it cannot be signed twice.
See also: Patient Card & Verified Documents Visits (EMR) Patient Portal Operation Theatre
Vaccinations
The national childhood schedule — nine vaccines, twenty-two doses on the Egyptian EPI calendar — generated from the birth date. Each dose is due, given (with lot, site and manufacturer) or skipped with a reason; overdue doses are on a list; reminders reach the parent; the card prints.
Where:Clinical › Vaccinations · Configuration › Vaccines & Schedule
Before you start
- Schedule
- Clinical › Configuration › Vaccines & Schedule: the vaccines in the national schedule with their doses and due ages. Add travel and optional vaccines with “in schedule” off.
How to
Generate a child’s schedule
- A newborn registered under two years gets the schedule at registration.
- For any other patient: patient form › Generate vaccination schedule.
Record a dose given
- Clinical › Vaccinations › filter Due this week (or from the patient › Vaccinations).
- Open the dose › Record as given: date, lot, vial expiry, site, manufacturer, any reaction.
- The pharmacy stock item, if linked, is consumed.
Skip a dose
- Open the dose › Skip; say why: contraindication, given elsewhere, declined.
- Back to due reverses it.
Print the vaccination card and remind the parent
- Patient › Print vaccination card: every dose with its date and lot.
- The parent sees the same card on the portal and the app; a push or SMS reminder goes out when a dose is due.
See also: Patients & Registration Patient Portal SMS Messages
Emergency Department
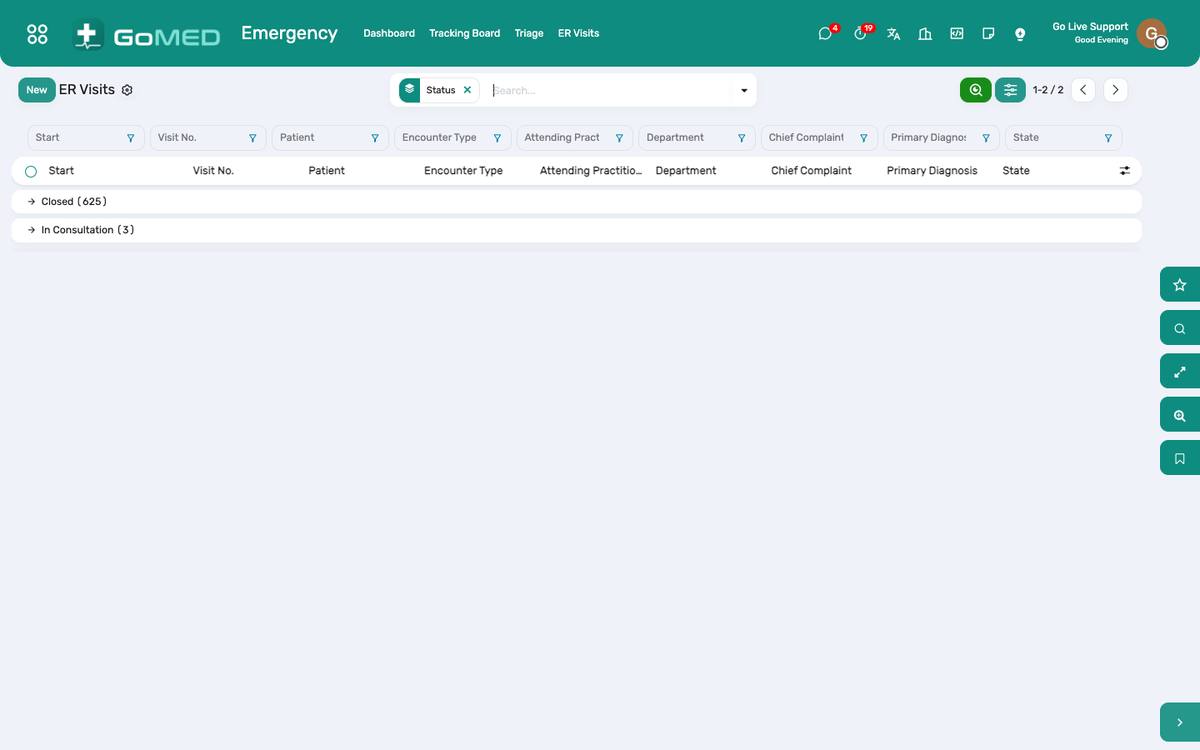
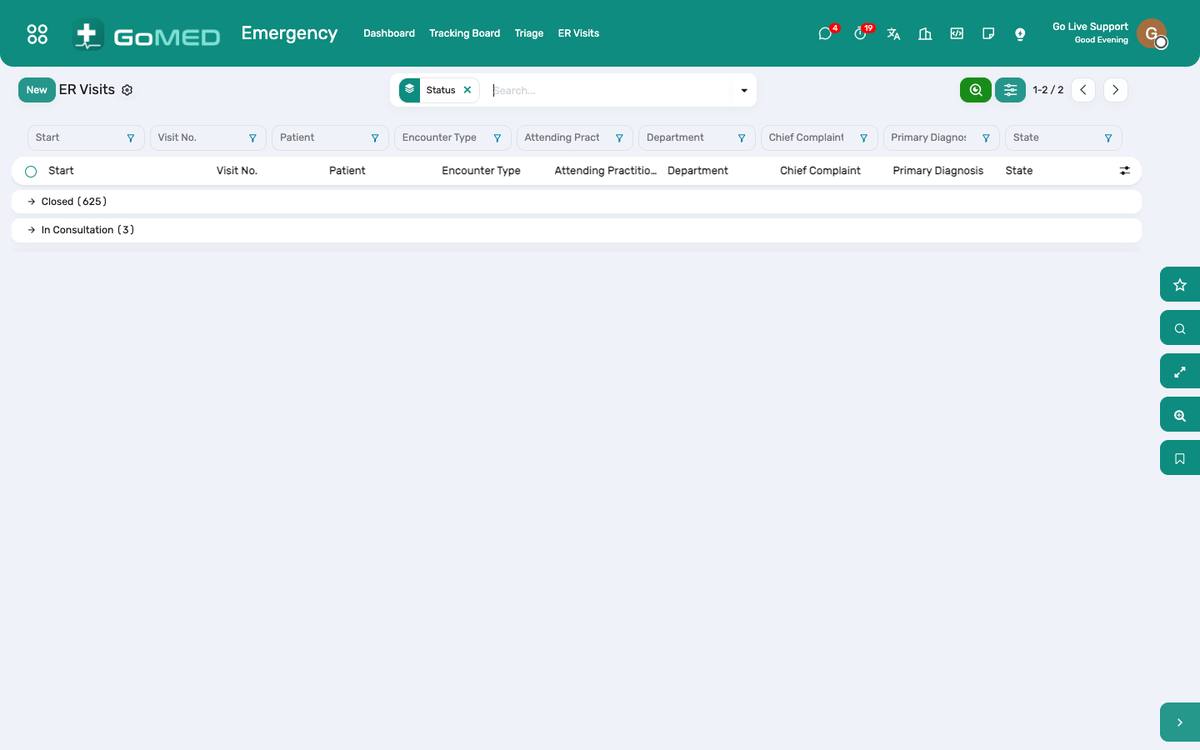
Triage in seconds on the ESI 1–5 scale with the first vitals, a tracking board of everyone in the department by acuity and waiting time, and a disposition — admit, discharge, transfer, left against advice, deceased — with its paperwork.
Where:Emergency › Triage · Tracking Board · ER Visits
How to
Triage an arrival
- Emergency › Triage › New: the patient (or Quick register for an unknown one), arrival mode, chief complaint, first vitals.
- Choose the ESI level; the time of triage is stamped.
- Assign a bay or a bed; the patient appears on the tracking board.
Work the tracking board
- Emergency › Tracking Board: sorted by acuity, then waiting time; colour by level.
- Click a patient to open the ER visit; Seen by doctor stamps the door-to-doctor time.
- Orders, results and vitals are on the visit as in any other.
Record the disposition
- On the ER visit, Disposition: Admit (opens the admission and books a bed), Discharge (with instructions), Transfer (destination, ambulance), Left against advice, Deceased.
- The length of stay is computed; the dashboard reports door-to-doctor and length of stay per shift.
See also: Admissions & Bed Board Visits (EMR) Ambulance, Diet, Housekeeping, CSSD & Mortuary
Admissions & Bed Board
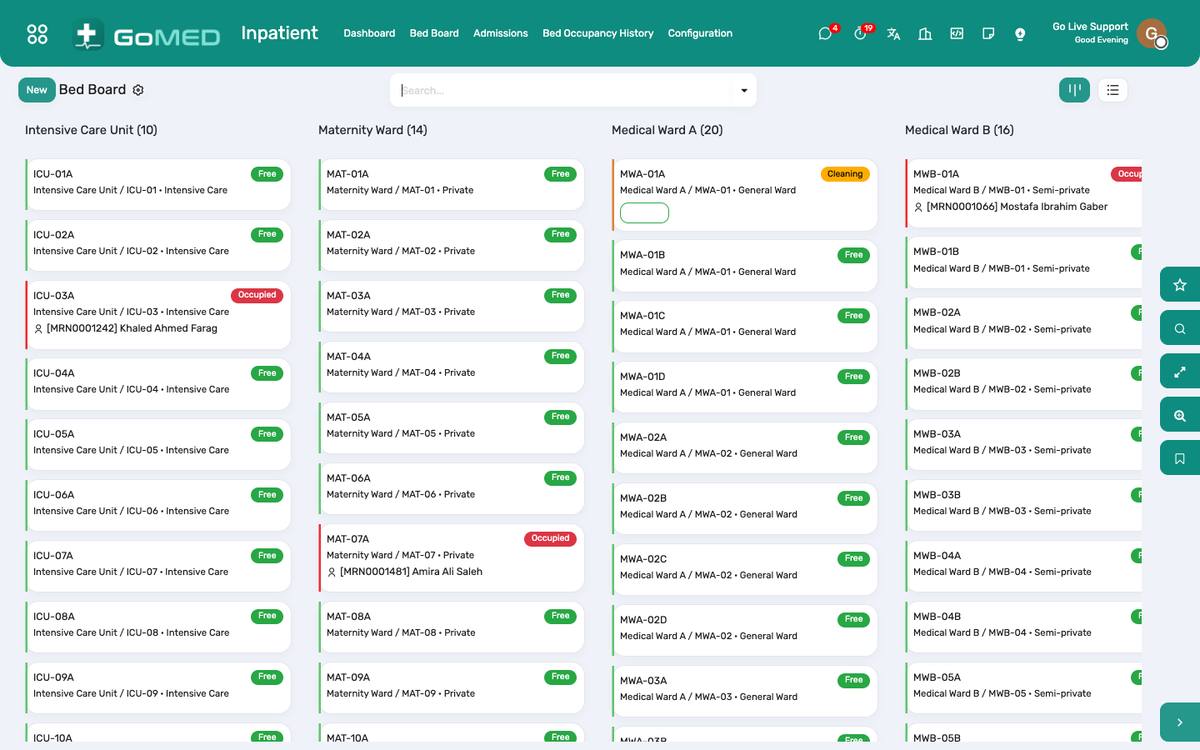
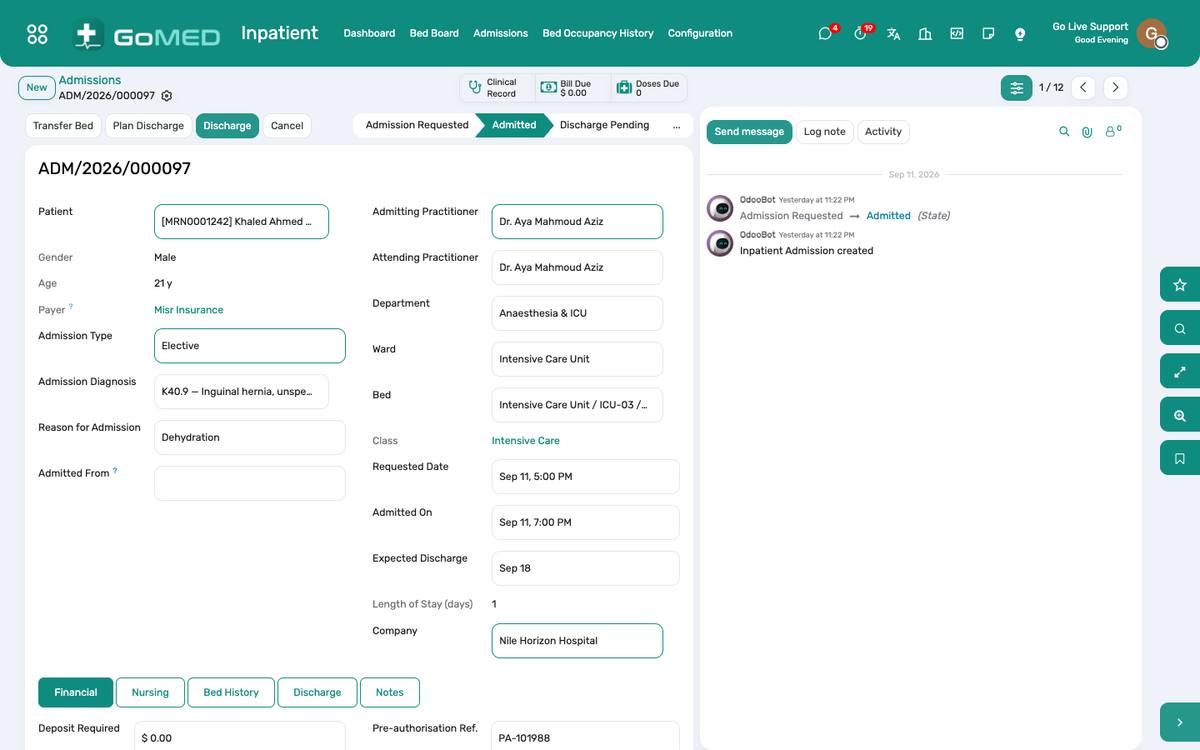
Wards, rooms and beds with classes and prices; admissions from the ER, the clinic or a booking; transfers between beds and wards; discharge with a summary; the bed board that shows the hospital at a glance and accrues the bed-day charge every night.
Where:Inpatient › Bed Board · Admissions · Configuration › Wards
Before you start
- Wards and beds
- Inpatient › Configuration › Wards: rooms, beds, bed class (general, semi-private, private, ICU) and the daily service each class bills.
How to
Admit a patient
- Inpatient › Admissions › New (or Admit from the ER visit or the clinic visit).
- Patient, attending practitioner, admitting diagnosis, expected length of stay, the payer; pick a free bed on the board.
- Confirm: the bed turns occupied, the wristband prints, the inpatient visit opens for the ward.
Transfer between beds or wards
- On the admission, Transfer: the new bed, the reason, the time.
- The bed history keeps every move; the bed-day charge follows the class of the bed slept in.
Discharge
- On the admission, Discharge pending when the doctor decides; the cashier sees the bill to settle.
- Discharge: type (home, transfer, against advice, deceased), summary, medicines to take home, follow-up date.
- The bed is released to Housekeeping for cleaning and returns to free when they confirm.
Read the bed board
- Inpatient › Bed Board: wards as columns, beds as cards with the patient, days in, alerts, NEWS2 and the next due item.
- Filter by ward; click a bed to open the admission; free and cleaning beds are colour-coded.
- Occupancy history is under Inpatient › Bed Occupancy History for the monthly report.
See also: Nursing Station & Barcode eMAR Intensive Care Charting Bills, Charges & Cashier Emergency Department
Nursing Station & Barcode eMAR
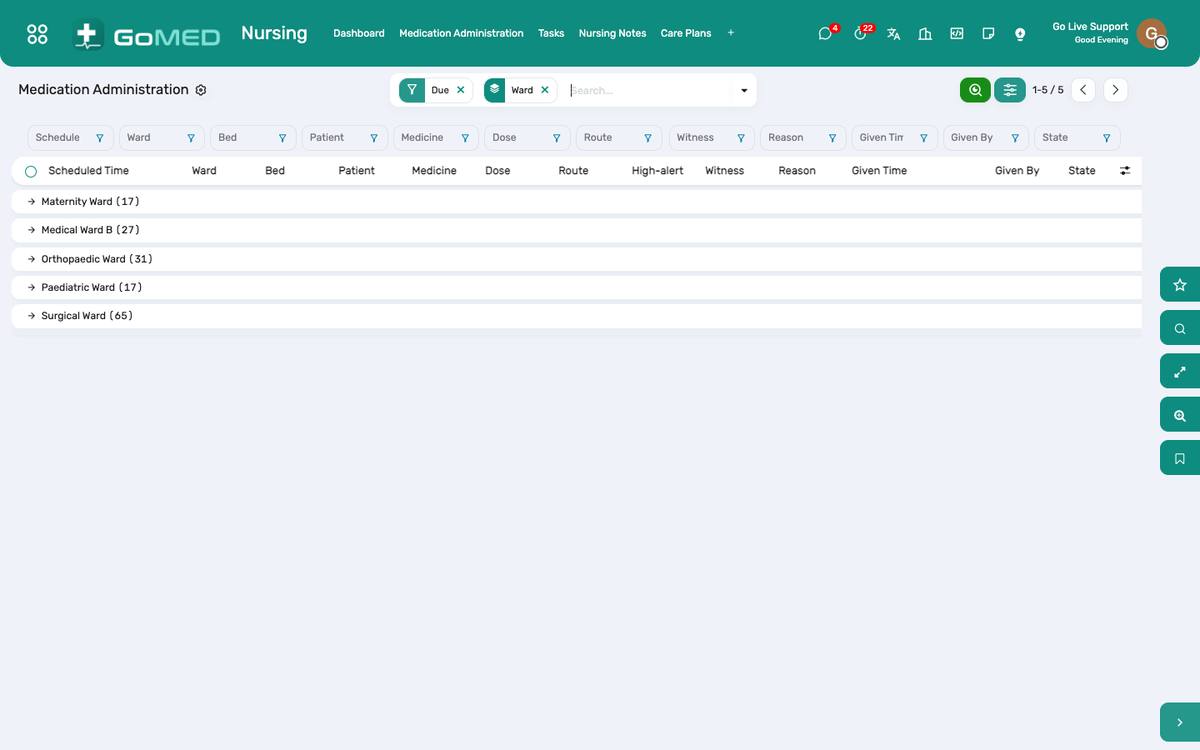
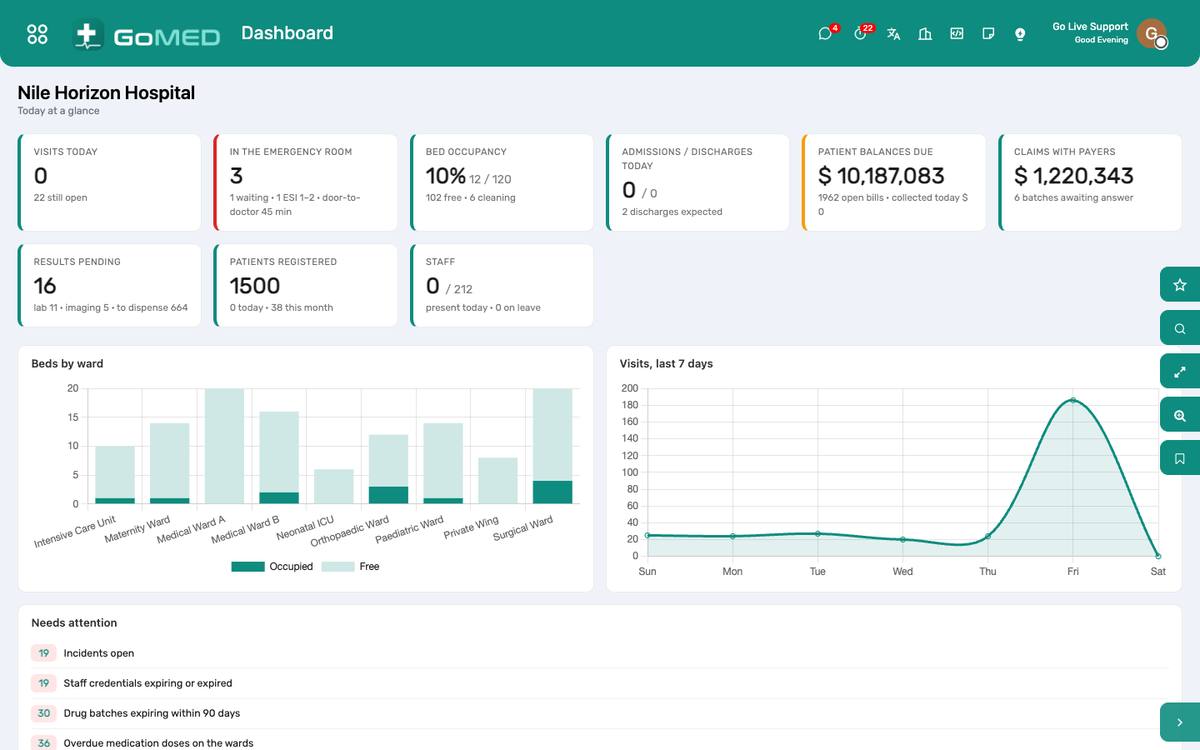
The ward’s working day: doses due on the medication administration record, given after scanning the wristband and the medicine, notes and care plans per shift, tasks with due times, intake and output, the shift handover, and the early-warning ward board that shows every patient’s latest NEWS2 and whether the next observations are overdue.
Where:Nursing › Bed Board · Medication Administration · Ward Board — Early Warning · Shift Handover
Before you start
- Barcodes
- Every medicine needs its barcode on the medicine master (Pharmacy › Medicines); the wristband carries the patient code. A USB or Bluetooth scanner works as a keyboard.
- High-alert medicines
- Tick High-alert on the medicine master; those doses require a witness.
How to
Give a dose with the scanner
- Nursing › Medication Administration: doses due on your ward, overdue ones first.
- Click Give on the dose; the Give a Dose window opens.
- Scan the wristband: ✓ Patient confirmed, or ✗ if it is another patient’s band.
- Scan the medicine pack: ✓ Medicine confirmed, or ✗ if the barcode is another product.
- For a high-alert medicine, choose the witness (a second nurse).
- Give. The dose is recorded as scanned, with your name and the time.
Give a dose without the scanner
- In the Give a Dose window tick Confirm by hand and say why: no scanner on the round, unreadable band, no barcode on the pack.
- Give. The dose is recorded as confirmed by hand with the reason; nothing is blocked, everything is recorded.
Hold or refuse a dose
- On the dose, Hold (with the reason: nil by mouth, vitals, procedure) or Refused by patient.
- The prescriber sees held and refused doses on the visit.
Run the early-warning ward board
- Nursing › Ward Board — Early Warning: every admitted patient, their latest NEWS2 and band, the time of the last observations and whether the next set is overdue for the interval the score calls for.
- Record observations from the board: the row’s Vital Signs button.
- A medium or high score has already raised an activity for the ward nurse; acknowledge it after the review.
Write notes, care plans and tasks
- Nursing › Nursing Notes › New per shift: assessment, interventions, response.
- Care Plans: goals and interventions per problem, reviewed on a date.
- Tasks: turn, dressing, blood sugar — with a due time; the ward’s call-for-help requests from the app land here too.
- Intake / Output: fluids in and out per shift; the balance is on the admission.
Hand over the shift
- Nursing › Shift Handover › New for the ward: the open items per patient are pulled in; add what the next shift must know.
- Sign; the incoming nurse reads and acknowledges it.
See also: Prescriptions & Orders Admissions & Bed Board Intensive Care Charting Pharmacy & Dispensing
Intensive Care Charting
One chart per patient per day: hourly observations with the mean arterial pressure computed, CVP, urine output and fluid balance, sedation (RASS) and GCS, ventilator settings as they change, every line and tube with its days in, and the goals for the day reviewed at the evening round.
Where:Nursing › ICU Charts · on the admission: ICU chart today
How to
Open today’s chart
- On the admission (or from Nursing › ICU Charts), click ICU chart today; it is created if it does not exist.
- The header shows intake, output, balance and the lowest MAP so far.
Chart the hour
- Add the next hour: a row is created at the next hour; fill pulse, SBP/DBP (MAP computes), RR, SpO₂, temperature, GCS, RASS, pain, CVP, urine, other output, intake, glucose.
- A MAP under 65 or a saturation under 90 turns the row red; a GCS under 9 orange.
Record ventilator settings
- Ventilation tab › Add: time, mode (spontaneous, nasal cannula, mask, high-flow, NIV, volume control, pressure control, SIMV, pressure support, APRV), FiO₂, PEEP, tidal volume, rate, pressure support, peak and plateau pressures.
- Add a new line every time a setting changes; the previous ones stay as the history.
Track lines and tubes
- Lines and tubes tab › Add: type (CVC, arterial line, PICC, ET tube, tracheostomy, NG, urinary catheter, drains, epidural), site, the time inserted and by whom.
- Days in counts itself; past seven days the line is highlighted so the round asks whether it is still needed.
- Remove stamps the removal time; the device stays on the admission’s history.
Set and review daily goals
- Daily goals tab: write the plan at the morning round (wean, sedation hold, breathing trial, mobilise, feeds).
- Tick “reviewed at the evening round” when it has been.
See also: Nursing Station & Barcode eMAR Admissions & Bed Board
Operation Theatre
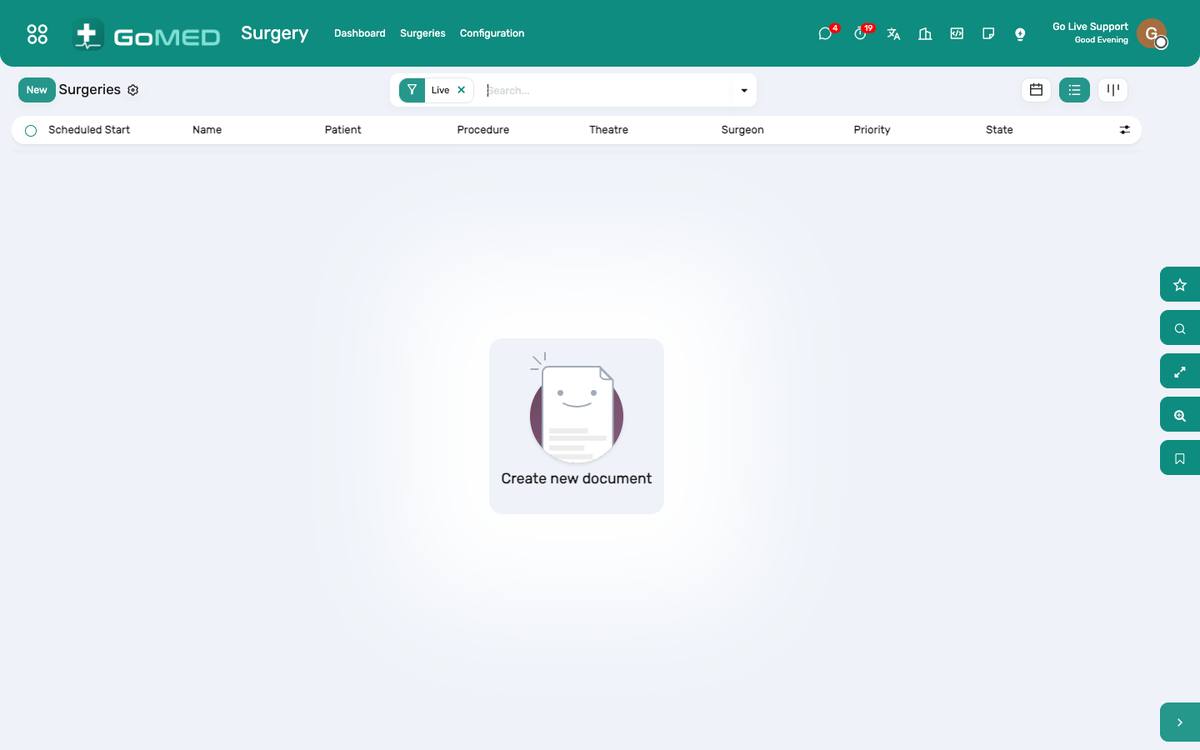
The operating list per theatre, the team, the pre-operative orders; the WHO surgical safety checklist as nineteen named items read aloud in three phases; two independent counts before closure; the operative note signed and locked; consumables and implants charged; theatre utilisation measured.
Where:Surgery › Surgeries · Theatres · Theatre Utilisation · Configuration › Safety Checklist
Before you start
- Theatres
- Surgery › Configuration › Theatres: rooms and their sessions.
- Checklist items
- Surgery › Configuration › Safety Checklist: the nineteen WHO items ship; edit the wording or add local items. Items marked “read aloud” exist to be said, not ticked.
How to
Schedule an operation
- Surgery › Surgeries › New: patient, procedure (from the service catalogue), surgeon, anaesthetist, theatre, date and planned duration, urgency.
- Pre-operative orders (bloods, imaging, consent) are raised from the surgery; the consent shows on the surgery once signed.
- Confirm; it appears on the theatre’s list.
Run the safety checklist
- On the day, Build the checklist on the surgery (once).
- Sign In — before induction: the nurse reads each item aloud; the team confirms; tick Checked (or N/A with a note). Click Sign In when the phase is complete; an incomplete phase is refused and names what is missing.
- Time Out — before skin incision: introductions by name and role; patient, site and procedure confirmed aloud by surgeon, anaesthetist and nurse; critical steps, blood loss, antibiotics, imaging. Click Time Out.
- Sign Out — before the patient leaves: the procedure name confirmed aloud, the counts complete, specimens labelled and read back, equipment problems, recovery concerns. Click Sign Out.
Count sponges, needles and instruments
- Counts tab: the opening count by two different people (the same person twice is refused).
- Before closure: the closing count by two people; it is compared with the opening count.
- A mismatch keeps the patient in the room: recount, or a surgery manager releases it with a reason (X-ray clear, item accounted for). The reason prints on the operative report.
Write and sign the operative note
- Procedure note, findings, post-operative diagnosis, complications, wound class (I clean to IV dirty).
- Sign the operative note: it is locked. Only a surgery manager can reopen it, and the previous text is kept in the chatter.
Charge consumables and implants
- Consumables tab: items issued from the theatre store are charged to the patient; implants with lot and serial.
- Theatre time and the surgeon’s and anaesthetist’s fees are captured for the bill and the doctor statement.
Cancel an operation and measure utilisation
- Cancel with the reason (patient unfit, no bed, surgeon unavailable, theatre or equipment, previous case overran, anaesthetic reason).
- Surgery › Theatre Utilisation: scheduled against actual minutes per theatre and day, turnover between cases, cancellations by reason.
See also: Admissions & Bed Board Certificates & Consents Bills, Charges & Cashier Ambulance, Diet, Housekeeping, CSSD & Mortuary
Dental Charting
An odontogram on the FDI numbering — fifty-two teeth, permanent and deciduous — with findings per tooth and surface, oral hygiene and gingival status, and a treatment plan per tooth whose items capture their charge on the bill when marked done.
Where:on the dental visit: Dental chart · Clinical › Dental Charts · Configuration › Teeth (FDI)
How to
Chart the mouth
- On the visit, New dental chart (or Clinical › Dental Charts › New).
- Set dentition (permanent, deciduous, mixed), oral hygiene and gingiva.
- Findings › Add: the tooth by FDI number, the condition (caries, restoration, crown, bridge, root canal, fracture, mobility, impacted, missing, implant, for extraction), the surfaces (mesial, distal, occlusal, buccal, lingual), severity and a note.
- The odontogram redraws with each finding: caries red, restorations blue, missing struck through.
Plan and bill treatment
- Treatment plan › Add: the tooth, the service (filling, extraction, root canal, crown…), a note; the price shows from the catalogue.
- When the work is done, mark the item Done: the charge is captured on the patient’s bill and the item shows the date.
- Cancel an item the patient declined.
Complete the chart
- Complete: a summary of the findings is posted to the visit’s chatter.
- Reopen to correct; every chart of the patient stays on the record as the history.
See also: Visits (EMR) Bills, Charges & Cashier
Physiotherapy
An assessment with range of motion in degrees, active and passive, against the normal for each joint and movement; muscle power on the MRC 0–5 scale; a session plan; and sessions recording modalities, pain before and after, and a progress note — so progress is a chart.
Where:on the visit: New assessment · Clinical › Physiotherapy · Configuration › Joints & Movements
How to
Assess a patient
- On the visit, New physiotherapy assessment: kind (initial, review, discharge), presenting problem, onset, pain score and site, function score, goals and plan, sessions planned.
- Range of motion › Add: the movement (joint proposed), side, active and passive degrees; the normal, the deficit and the percentage compute; tick painful, note the end feel.
- Muscle power › Add: muscle group, side, MRC grade.
Record a session
- Add a session: date, therapist, duration, the modalities used (exercise, manual therapy, TENS, ultrasound, interferential, hot and cold packs, traction, taping, hydrotherapy, gait, balance), exercises and technique, pain before and after, the progress note.
- Tick Charged when the session is billed; the count of sessions shows on the assessment.
Close the episode
- Complete the assessment: the limited movements are summarised on the visit’s chatter.
- A review assessment repeats the measurements and shows the change.
See also: Visits (EMR) Bills, Charges & Cashier
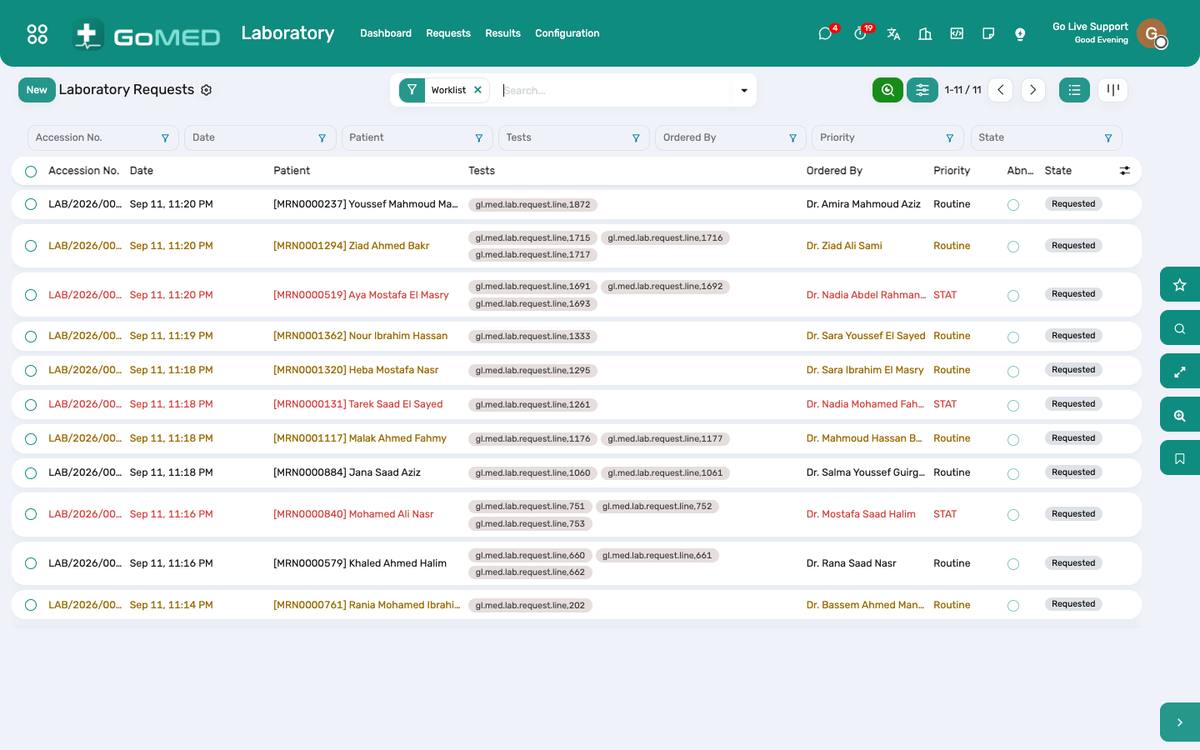
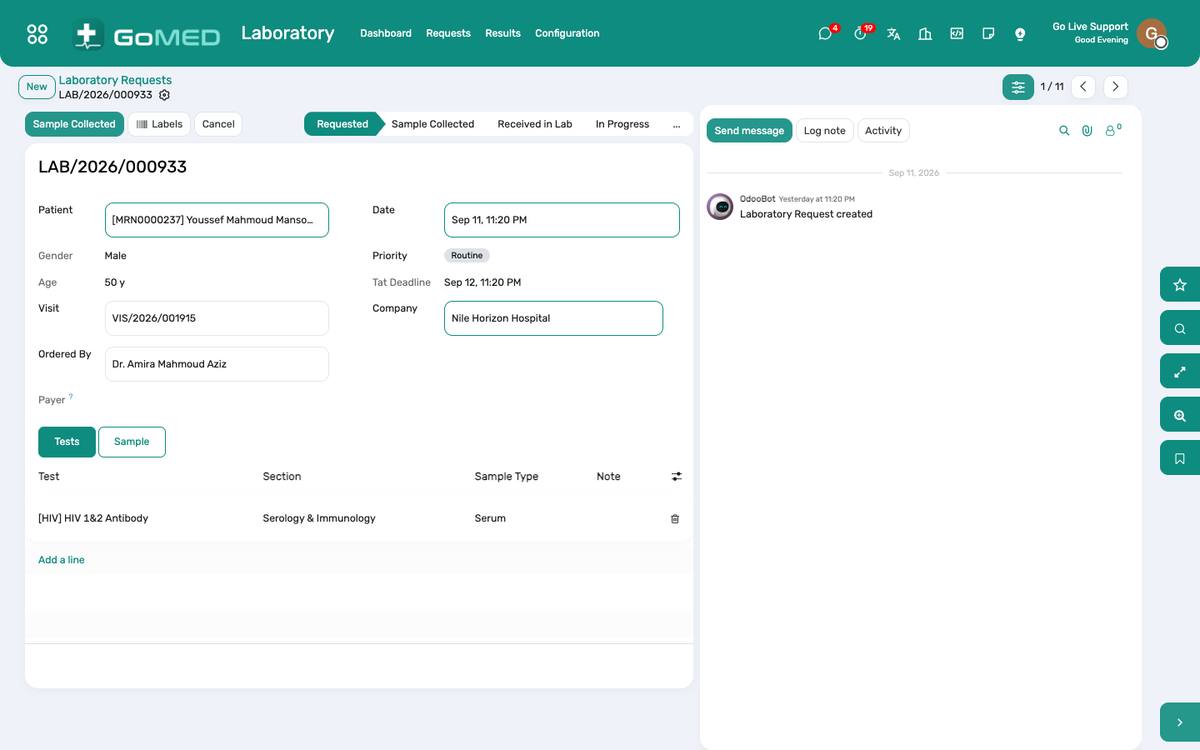
Laboratory & Specimens
From the order to the validated report without a paper requisition: the test catalogue with reference ranges by sex and age, specimens with a barcoded label and a chain of custody from the ward to the bench, result entry with abnormal and critical flags, pathologist validation before release, and a results-ready message to the patient.
Where:Laboratory › Requests · Specimens · Results · Configuration › Test Catalogue
Before you start
- Test catalogue
- Laboratory › Configuration › Test Catalogue: tests and panels, parameters with units and reference ranges by sex and age band, the sample type and container, the service (price) each test bills.
- Sections
- Haematology, chemistry, microbiology, serology… each with its bench.
- Billing gate
- Patients › Configuration › Settings › Charge before the sample is taken: on, a specimen cannot be collected until every test on the request is charged; off, the laboratory shows the warning and continues.
- Label printer
- The specimen label is 62 × 32 mm with a Code 128 barcode; any label printer at that size works.
How to
Receive an order and collect the specimens
- Laboratory › Requests › filter To collect: orders from the clinics, the wards and the ER, and requests typed at the desk.
- Open the request; Collect creates one specimen per sample type (EDTA, serum, citrate, urine, swab…) with its container and barcode.
- Print the label for each specimen and stick it on the tube at the bedside after scanning the wristband.
- If the billing gate is on and a test is not yet charged, collection is refused with the tests named: send the patient to the cashier first.
Send, receive and reject specimens
- On the ward, Send marks the specimens in transit with the time and the porter.
- At the bench, Receive scans the label: the transit time is recorded; the request moves to Received once every specimen has arrived.
- Reject a haemolysed, clotted, mislabelled or insufficient sample with the reason: the ward is told what to do differently and a fresh specimen is requested with Re-collect.
Enter and flag results
- Laboratory › Results, or the Results tab of the request: type each parameter; the reference range applies and flags high, low or critical.
- A critical value alerts the ordering practitioner immediately and is logged.
- Attach the analyser printout or an external report if needed.
Validate and release
- The pathologist opens the request › Validate: the report is signed and released to the visit, the portal and the app.
- A results-ready SMS goes to the patient if SMS is on.
- Amend a released result through Amend: the previous value stays visible with the correction.
Read the laboratory dashboard
- Laboratory › Dashboard: requests today, pending collection, in transit, awaiting validation, critical values, turnaround per test, rejected specimens by reason.
Questions the desk asks
The wristband will not scan.
Type the MRN in the specimen’s patient field and note the reason; the scan is preferred, not mandatory.
Can an outside laboratory’s result be recorded?
Yes: create the request with the external flag, attach the report under Documents and enter the values so they trend with the hospital’s own.
See also: Prescriptions & Orders Bills, Charges & Cashier SMS Messages Nursing Station & Barcode eMAR
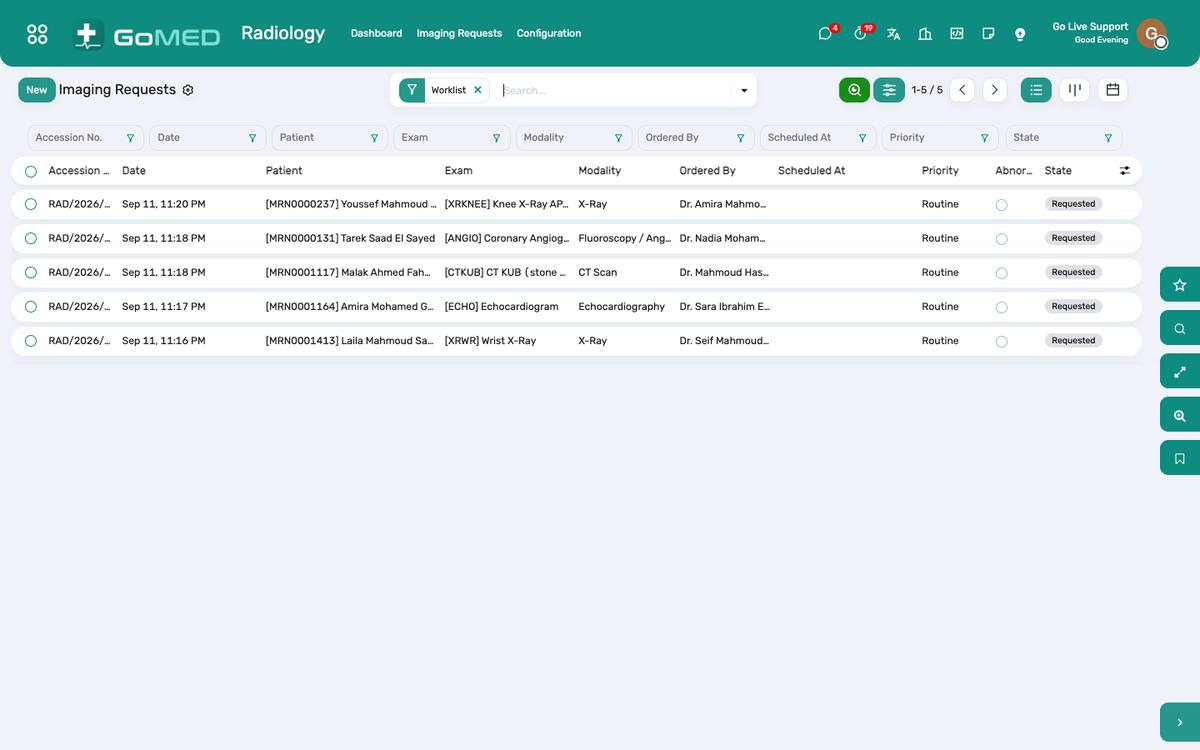
Radiology
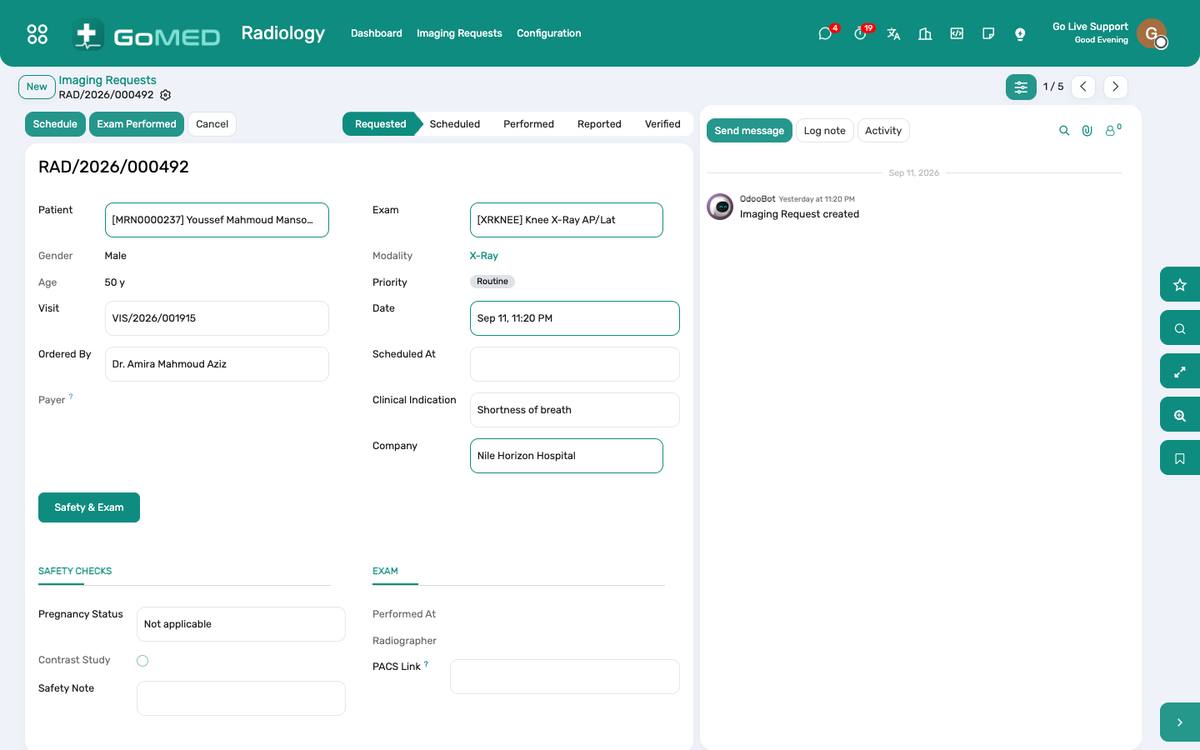
The exam catalogue by modality, imaging requests from the chart or the desk, safety checks before the study (pregnancy, contrast allergy, kidney function), the worklist per modality, the report written from a template and verified by the radiologist, and the link to the PACS study.
Where:Radiology › Imaging Requests · Configuration › Exam Catalogue · Modalities
Before you start
- Modalities and exams
- Radiology › Configuration: X-ray, CT, MRI, ultrasound, mammography…; each exam with its modality, duration, contrast, price and the report template.
How to
Register and schedule a study
- Radiology › Imaging Requests: orders from the visits arrive here; a walk-in request is typed with the referring doctor.
- Answer the safety questions: pregnancy status, contrast allergy, creatinine for contrast studies, metal implants for MRI.
- Schedule the slot on the modality; the patient receives the preparation instructions.
Perform the study
- Start when the patient is on the table; Done when the images are acquired; the accession number is the PACS key.
- Contrast given, dose and lot are recorded for the charge and the register.
Report and verify
- The radiologist opens the study, picks the report template, dictates or types findings and impression.
- Verify: the report is signed, released to the visit, the portal and the app; a results-ready SMS goes out.
- Critical findings notify the referring practitioner.
See also: Prescriptions & Orders Laboratory & Specimens Bills, Charges & Cashier
Pharmacy & Dispensing
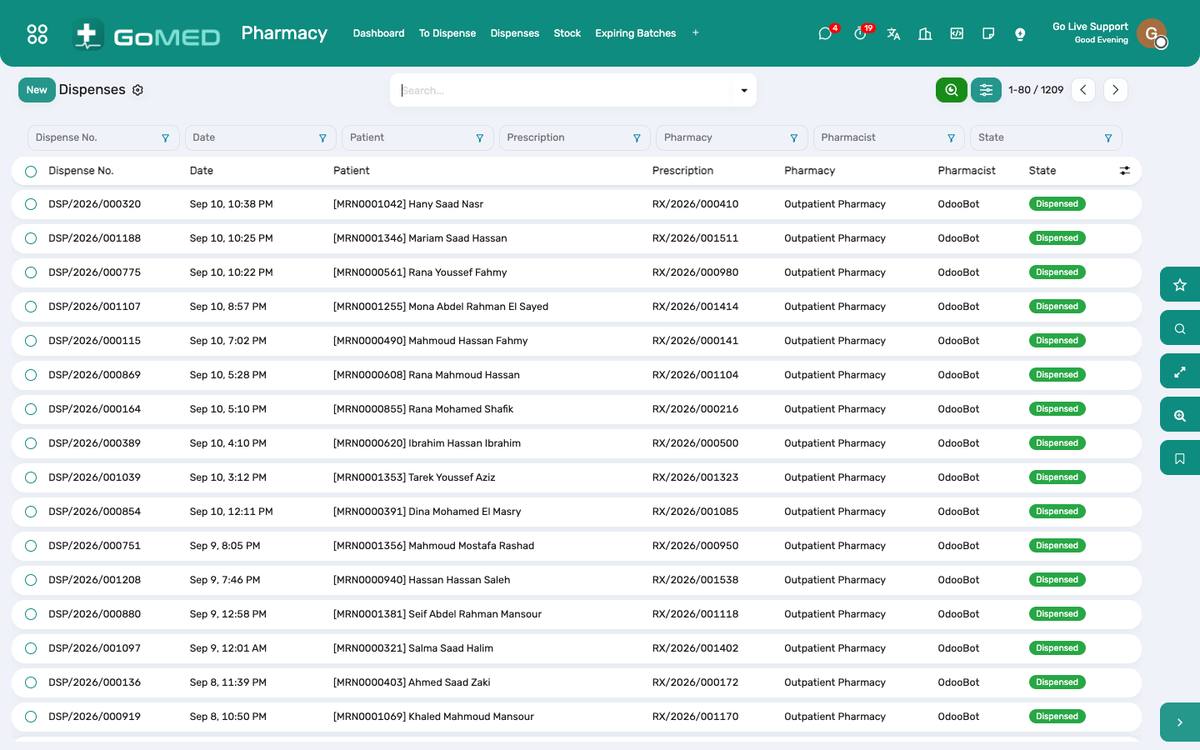
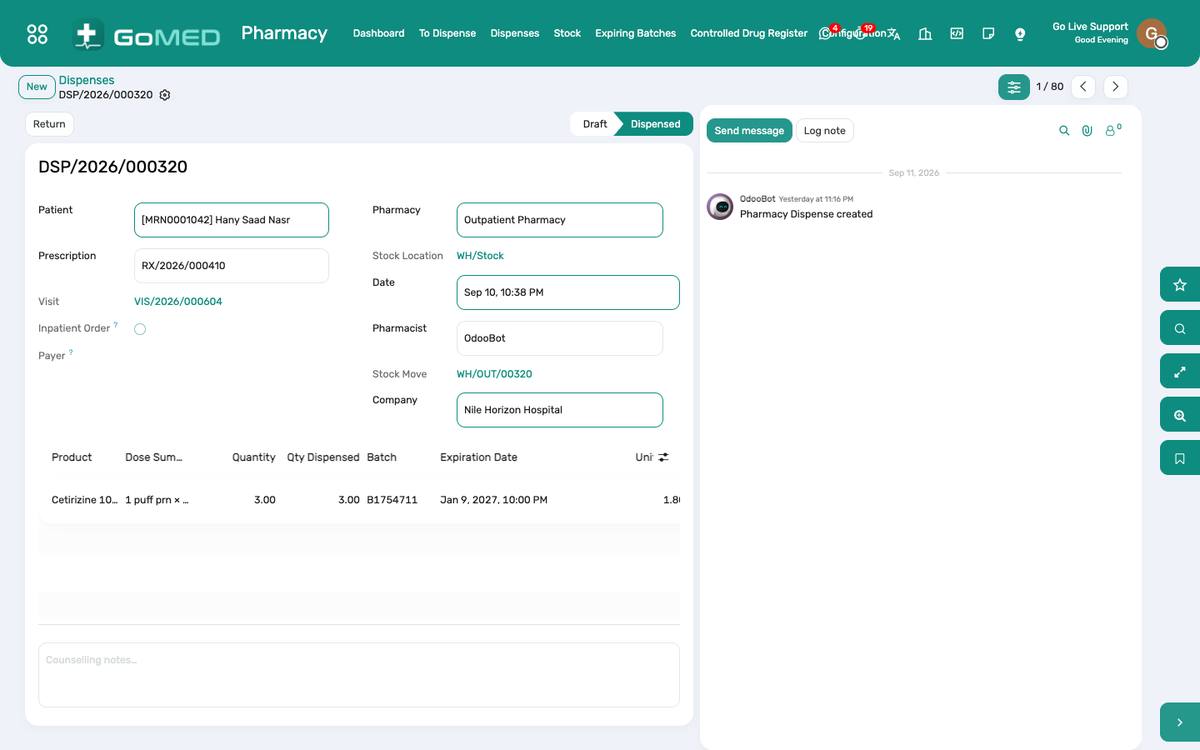
The medicine master with generic, form, strength, barcode and high-alert flag; stock by pharmacy and store with batches and expiry; the dispensing queue fed by signed prescriptions — validity checked, allergies checked, substitution recorded; ward stock issues; the controlled-drug register; expiring batches.
Where:Pharmacy › To Dispense · Dispenses · Medicines · Stock · Controlled Drug Register · Expiring Batches
Before you start
- Pharmacies and stores
- Pharmacy › Configuration › Pharmacies & Stores: outpatient pharmacy, inpatient pharmacy, main store, ward stocks — each a stock location.
- Medicines
- Pharmacy › Medicines: one product per strength and form, with the barcode printed on the pack so the eMAR can scan it.
How to
Dispense an outpatient prescription
- Pharmacy › To Dispense: signed prescriptions in order of arrival; open one (or scan the prescription barcode).
- Expired prescriptions are refused with a red banner — the patient needs a new one.
- For each line choose the batch (earliest expiry first is proposed); substitute a generic where allowed and record it.
- Dispense: stock moves, the charge is captured on the bill; the label prints with the instructions.
- The patient pays at the cashier (or the amount is on the inpatient bill).
Issue ward stock and inpatient medicines
- Inpatient prescriptions are dispensed to the ward’s stock; the nurse gives doses from the eMAR.
- Ward stock requests: Pharmacy › Stock › Ward requisition; issue against them and the ward’s location is credited.
Receive purchases and manage batches
- Purchases arrive through Purchasing › Receipts with batch and expiry per line.
- Pharmacy › Expiring Batches lists what expires in 90 days for return or use-first.
- Stock counts per location under Pharmacy › Stock.
Keep the controlled-drug register
- Every receipt, dispense and wastage of a controlled medicine writes a line in Pharmacy › Controlled Drug Register with the balance, the patient and the two signatories.
- Print the register per medicine per month for the inspector.
See also: Prescriptions & Orders Nursing Station & Barcode eMAR Purchasing, Stock & Maintenance Bills, Charges & Cashier
Blood Bank
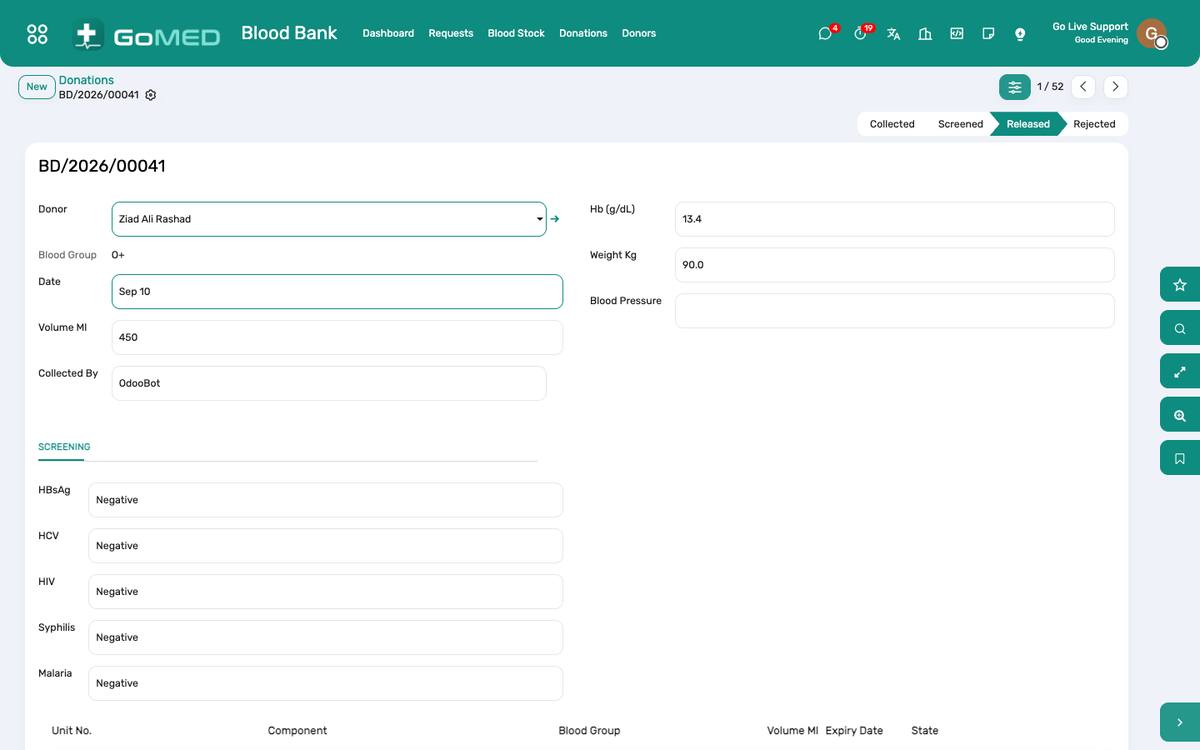
Donors and donations with screening, blood units by group and component with expiry, requests from the wards, cross-matching, issue and the transfusion record with the wristband scanned before the unit is hung.
Where:Blood Bank › Donors · Donations · Blood Stock · Requests
How to
Register a donor and a donation
- Blood Bank › Donors › New; eligibility questions, last donation date.
- Donations › New: the donor, the bag number, group and Rh, screening results; the unit enters stock as whole blood or components with their expiry.
Fulfil a request
- Requests arrive from the visits (or are typed): patient, group, component, units, urgency, indication.
- Cross-match: choose compatible units from stock; record the result.
- Issue: the units leave stock against the patient and the charge is captured.
Record the transfusion
- On the ward, the nurse scans the wristband and the unit before hanging it; vitals before, at 15 minutes and after; any reaction is reported as an incident.
See also: Laboratory & Specimens Nursing Station & Barcode eMAR Quality & Incidents
Dialysis
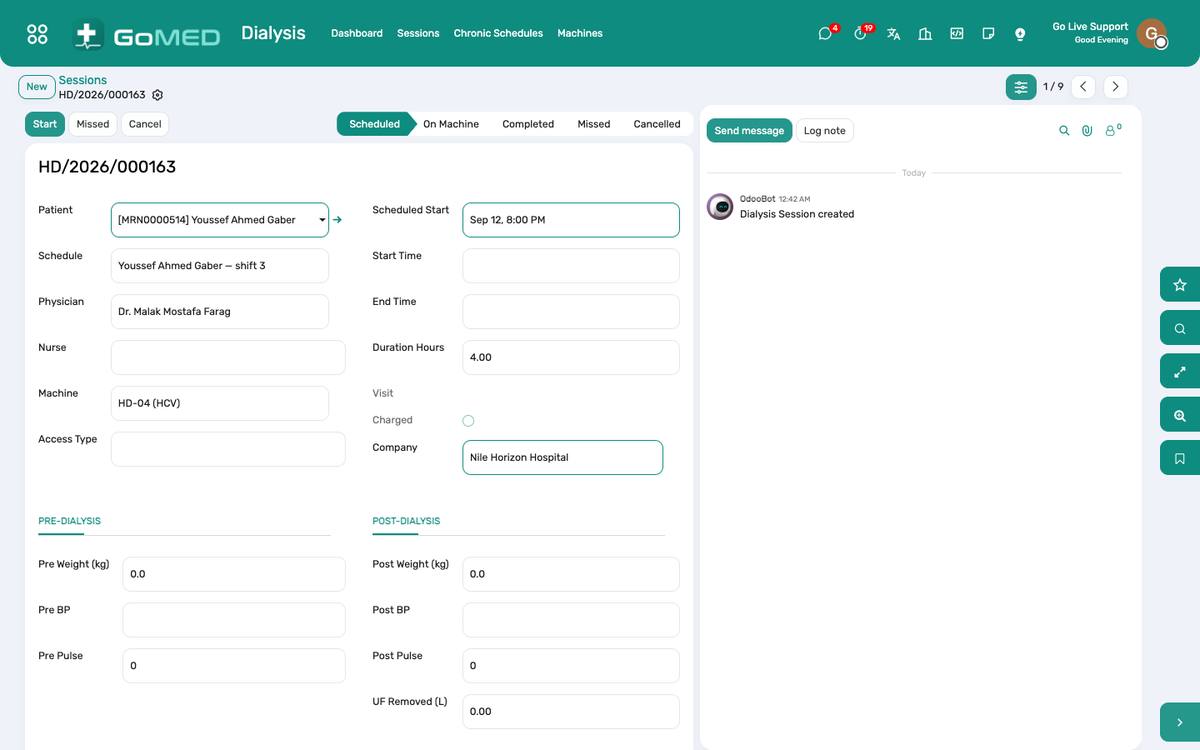
Machines and chairs, chronic patients on a weekly schedule, each session with pre- and post-weight, the prescription (duration, flow, dialyser, heparin), the hourly observations, complications and the charge.
Where:Dialysis › Sessions · Chronic Schedules · Machines
How to
Put a chronic patient on the schedule
- Dialysis › Chronic Schedules › New: patient, days of the week, shift, machine, the standing prescription.
- Sessions are generated for the coming weeks; the unit sees who is due today.
Run a session
- Open today’s session; Start with the pre-weight and vitals; confirm the prescription.
- Record observations hourly; note complications (hypotension, cramps, access problems).
- End with the post-weight; the fluid removed computes; the session is charged to the visit or the package.
Maintain machines
- Dialysis › Machines: each machine with its disinfection log and hours; maintenance requests go to the Maintenance app.
See also: Admissions & Bed Board Bills, Charges & Cashier Purchasing, Stock & Maintenance
Bills, Charges & Cashier
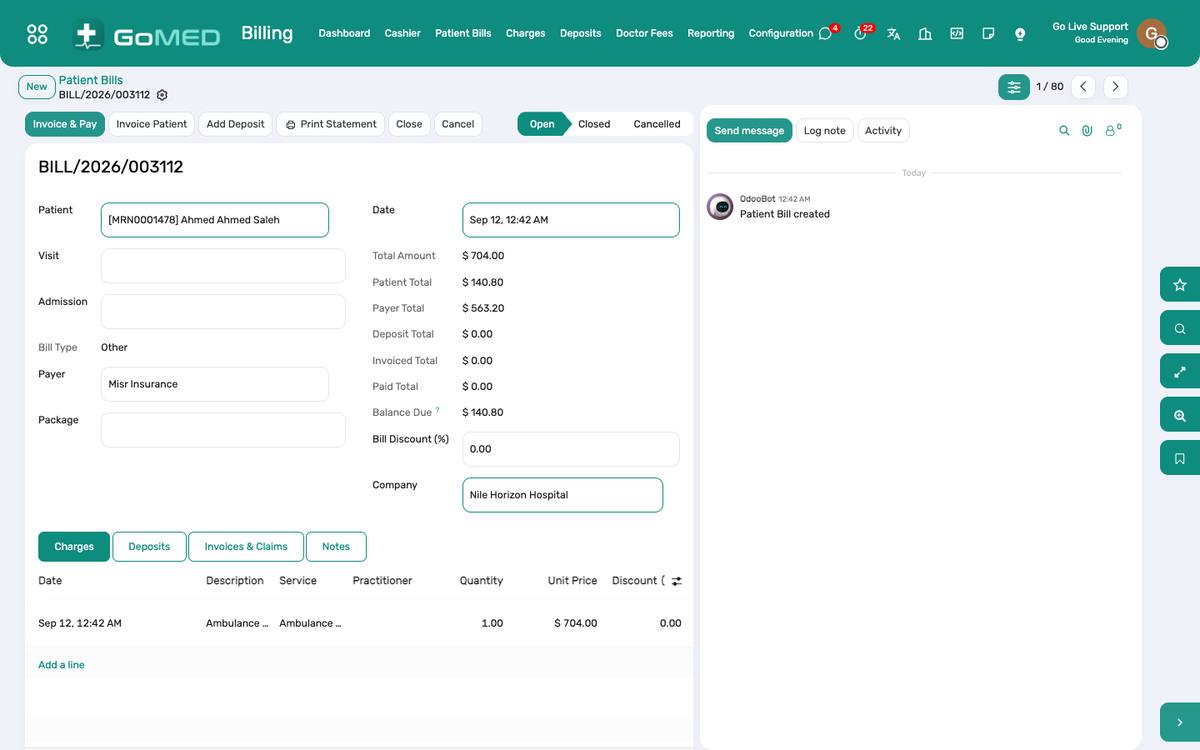
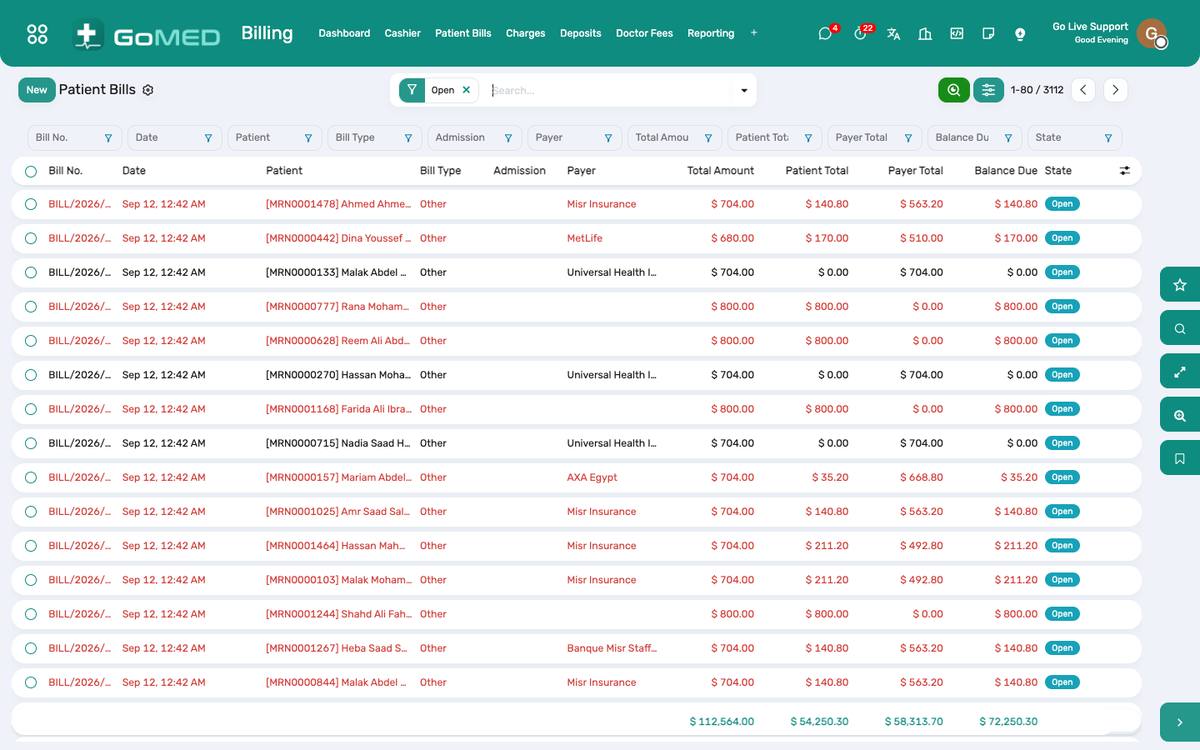
Every clinical act becomes a charge the moment it happens — consultation, test, study, dispense, bed-day, theatre, consumable — on a running bill per visit or admission, split between the payer and the patient by the plan’s rules. The cashier sees one amount due, takes the payment, prints the receipt; finance posts to the ledger.
Where:Billing › Patient Bills · Charges · Cashier · Deposits · Packages
Before you start
- Service catalogue
- Every service has a price and a product; payer tariffs sit on the payer’s pricelist.
- Payment methods and journals
- Billing › Configuration: cash, card, bank transfer, each on its accounting journal.
- Packages
- Billing › Packages: a bundle of services at one price — a delivery package, a check-up, a dialysis month.
How to
Take a payment at the cashier
- Billing › Cashier: the patient’s open bills; scan the card or search the name.
- The bill shows the charges, what the payer covers, the co-payment and the amount due from the patient.
- Register payment: method, amount; print the receipt.
- For an outpatient visit the desk usually collects before the consultation: the charge for the visit is already on the bill when the appointment is confirmed.
Add a charge by hand
- Billing › Charges › New (or from the bill): patient, service, quantity, the visit or admission it belongs to.
- Most charges never need this: they are captured by the clinical apps.
Take a deposit and settle an admission
- On admission, Deposits › New: the amount the family pays in advance; the receipt prints.
- During the stay the bill grows nightly with bed-days and every order.
- At discharge pending, the cashier opens the bill: the deposit is applied; the balance is paid or refunded; the bill is closed and posted.
Apply a discount or a package
- Discount on a bill line or the whole bill with a reason; above the limit it needs a manager’s approval (an activity is raised).
- Apply a package: the services inside are covered by the package price; anything outside is charged normally.
Close the day
- Billing › Cashier › Close session: the count by method against the receipts; differences are recorded.
- Finance sees the day’s takings on the cash and bank journals; the revenue report is under Billing › Reporting › Revenue Analysis.
Questions the desk asks
A charge is wrong.
Cancel it with a reason and add the right one; a posted bill is corrected with a credit note from Finance.
See also: Desk Payments (POS) Pre-authorisation, Claims & Doctor Fees Payers, Plans & Memberships Admissions & Bed Board
Desk Payments (POS)
For clinics that collect at a till: a booked visit, a laboratory request or an imaging request is sent to the cashier’s point of sale as an order to pay, with the patient as the customer and the reference on the receipt. The record shows when it was paid.
Where:on the appointment or request: Send to cashier · Point of Sale
Before you start
- A POS
- Point of Sale › Configuration › Point of Sale: create “Reception Desk” with its payment methods (cash, card).
- Open session
- The cashier opens the session in the Point of Sale app at the start of the day; Send to cashier needs an open session.
How to
Send a booking to the cashier
- On the appointment (or the laboratory or imaging request), click Send to cashier.
- The order appears in the open POS session with the service and the price; the appointment shows “Waiting at the cashier”.
Take the payment in the POS
- In the Point of Sale, open the order from the orders list (search the patient or the reference).
- Take the payment; print the receipt.
- The appointment or request now shows “Paid at the desk”; the POS order button opens the receipt.
Questions the desk asks
No point of sale session is open.
The cashier opens one from the Point of Sale app; then Send to cashier works.
See also: Bills, Charges & Cashier Appointments, Queue & Teleconsultation Laboratory & Specimens
Pre-authorisation, Claims & Doctor Fees
Pre-authorisation requests where the plan demands them, claim batches per payer built from the covered charges, submission, remittance and rejection handling, and doctor fee statements computed from the same charges — revenue share without a second reconciliation.
Where:Billing › Pre-authorisations · Claims · Doctor Fees · Statements
How to
Request a pre-authorisation
- On the bill or the admission, Pre-authorisation › New: the services, the estimated amount, the clinical justification; attach the payer’s form.
- Send; record the payer’s answer (approved amount, number, validity) when it comes; the bill shows the approval.
Build and submit a claim batch
- Billing › Claims › New: payer, period; the covered charges of closed bills are pulled in.
- Check the lines; export the payer’s file or print the claim forms; Submit.
- Record the remittance when paid: per line, paid, partially paid or rejected with the reason.
- Rejected lines go to a resubmission batch or are written off; the activity view keeps the follow-ups.
Produce doctor fee statements
- Billing › Doctor Fees: the share rules per practitioner (percentage or fixed per service).
- Statements per period: the fee lines from the charges, the amount due to each practitioner; approve and hand to payroll or accounts payable.
See also: Payers, Plans & Memberships Bills, Charges & Cashier Staff, Roster, Attendance & Payroll
Medical Records, Coding & Registers
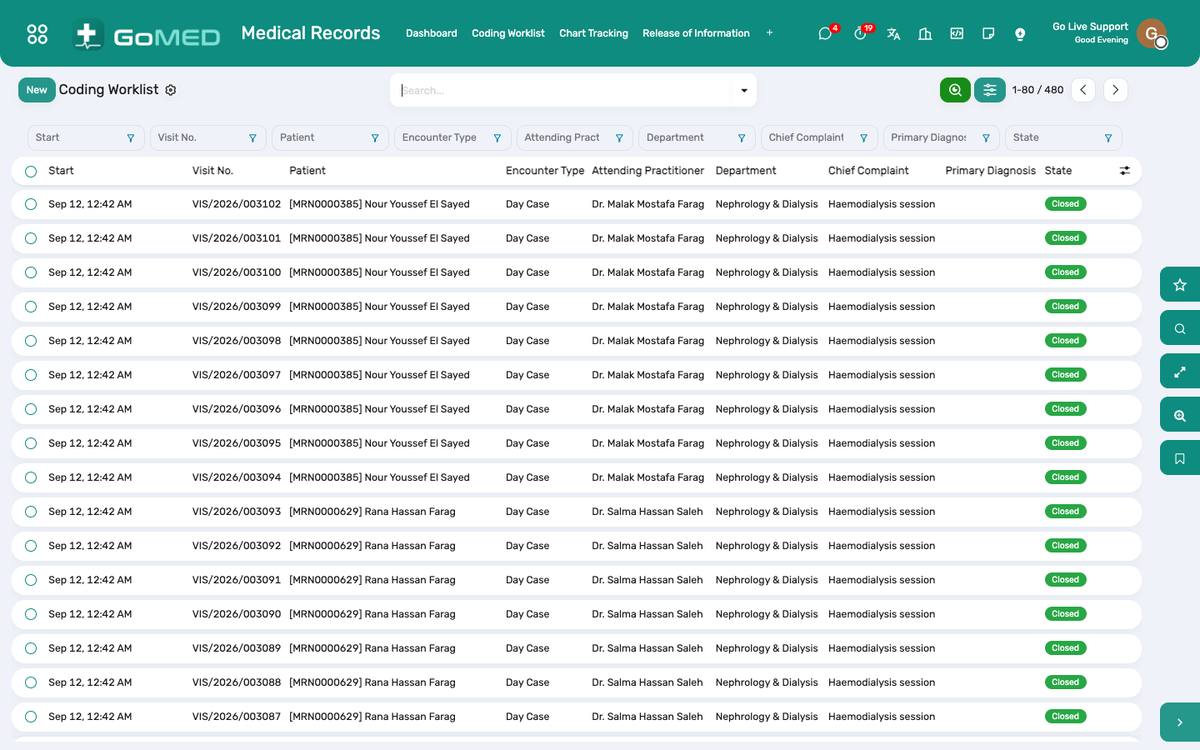
Chart tracking between departments, the ICD-10 coding worklist per discharged visit, release of information with consent and audit, and the statutory registers — births, deaths, notifiable diseases — with printed notifications that are frozen once issued.
Where:Medical Records › Coding Worklist · Chart Tracking · Release of Information · Births · Deaths · Notifiable Diseases
How to
Code a discharged visit
- Medical Records › Coding Worklist: visits closed without complete codes.
- Open the visit, review the diagnoses and procedures, add or correct the ICD-10 codes, mark Coded.
- Claims are built from coded visits; the dashboard shows coding completeness and turnaround.
Track a physical chart
- Chart Tracking › Request: who wants which chart; Out when it leaves the archive; Returned when it is back.
- Overdue charts are listed for the archivist.
Release information
- Release of Information › New: who asks (patient, insurer, court, another hospital), what, the consent attached.
- Approve; Released with what was given and to whom; Refused with the reason. Every step is on the audit trail.
Issue a birth notification
- Medical Records › Births › New: mother, date and time, sex, weight, delivery type, attending practitioner, the newborn’s name, the father’s name, national ID and nationality, plurality and order, place of birth.
- Issue the notification: a number and a QR are assigned; print the notification in the country’s layout (Egypt ships; the Hijri date prints beside the Gregorian date if enabled).
- An issued notification cannot be edited. To correct it: Cancel with a reason, then Reissue corrected — a new draft pointing at the cancelled one, issued under a new number.
Issue a death notification
- Medical Records › Deaths › New: patient, date and time, place, the certifying practitioner, the WHO chain — immediate cause, underlying cause (coded), contributing condition, intervals — and the manner.
- Issue: the notification prints with its QR; the patient file is flagged deceased and the patient card revoked.
Report a notifiable disease
- Notifiable Diseases › New (or from the visit when a notifiable diagnosis is coded): the diagnosis, the date, the practitioner.
- Reported with the reference when the authority has been notified.
See also: Patient Card & Verified Documents Patient Documents & Photo Pre-authorisation, Claims & Doctor Fees
Quality & Incidents
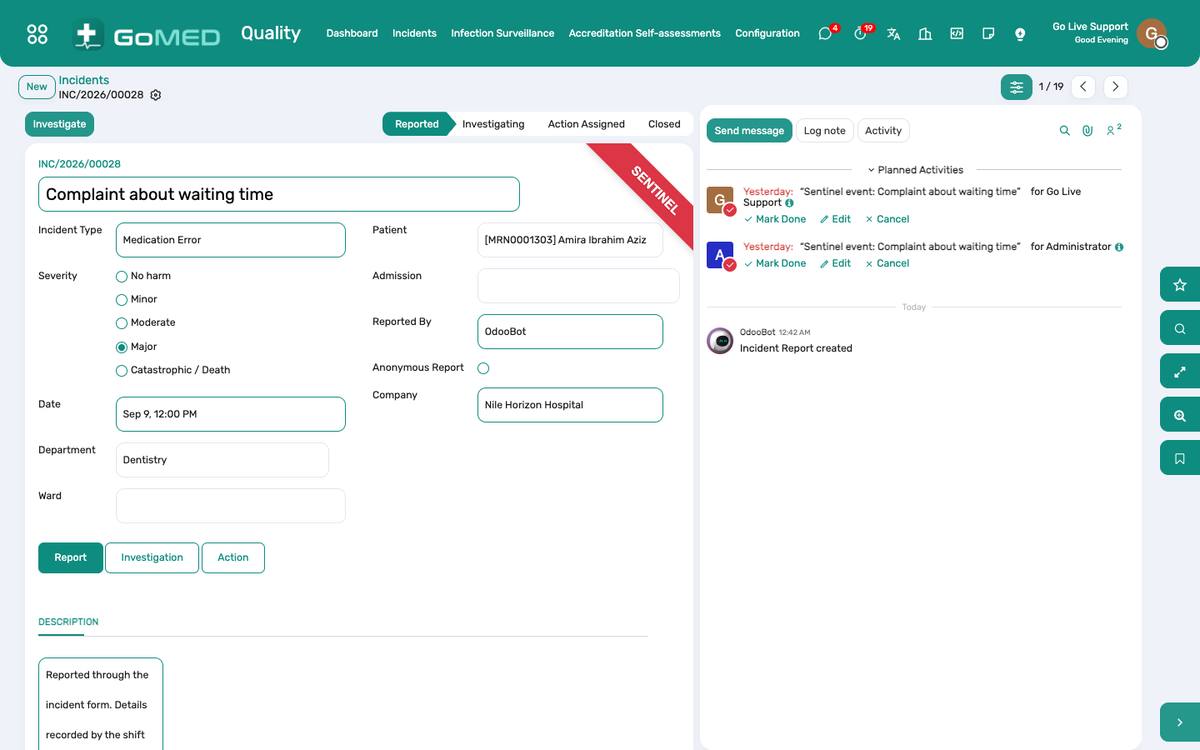
Incident reporting with severity, root cause and corrective actions; infection surveillance with device days and rates; accreditation self-assessments against checklist templates; the quality dashboard with the indicators the accreditor asks for.
Where:Quality › Incidents · Infection Surveillance · Accreditation Self-assessments · Configuration › Checklist Templates
How to
Report and investigate an incident
- Quality › Incidents › New (anyone can report): type (fall, medication error, transfusion reaction, needle-stick, complaint…), when, where, who was involved, what happened.
- The quality officer classifies severity, investigates, records the root cause and assigns corrective actions as activities with owners and deadlines.
- Close when the actions are done; the trend is on the dashboard.
Run infection surveillance
- Infection Surveillance › New per case: the infection, the site, the device (central line, catheter, ventilator) and its days, the organism, the ward.
- Device days come from the ICU lines-and-tubes record where it is used; rates per 1,000 device days are on the dashboard.
Self-assess for accreditation
- Configuration › Checklist Templates: the standards and their items.
- Accreditation Self-assessments › New: the template, the assessor; score each item compliant, partial or not, with evidence.
- The score per chapter and the gaps are the work plan.
See also: Intensive Care Charting Nursing Station & Barcode eMAR Help Desk
Ambulance, Diet, Housekeeping, CSSD & Mortuary
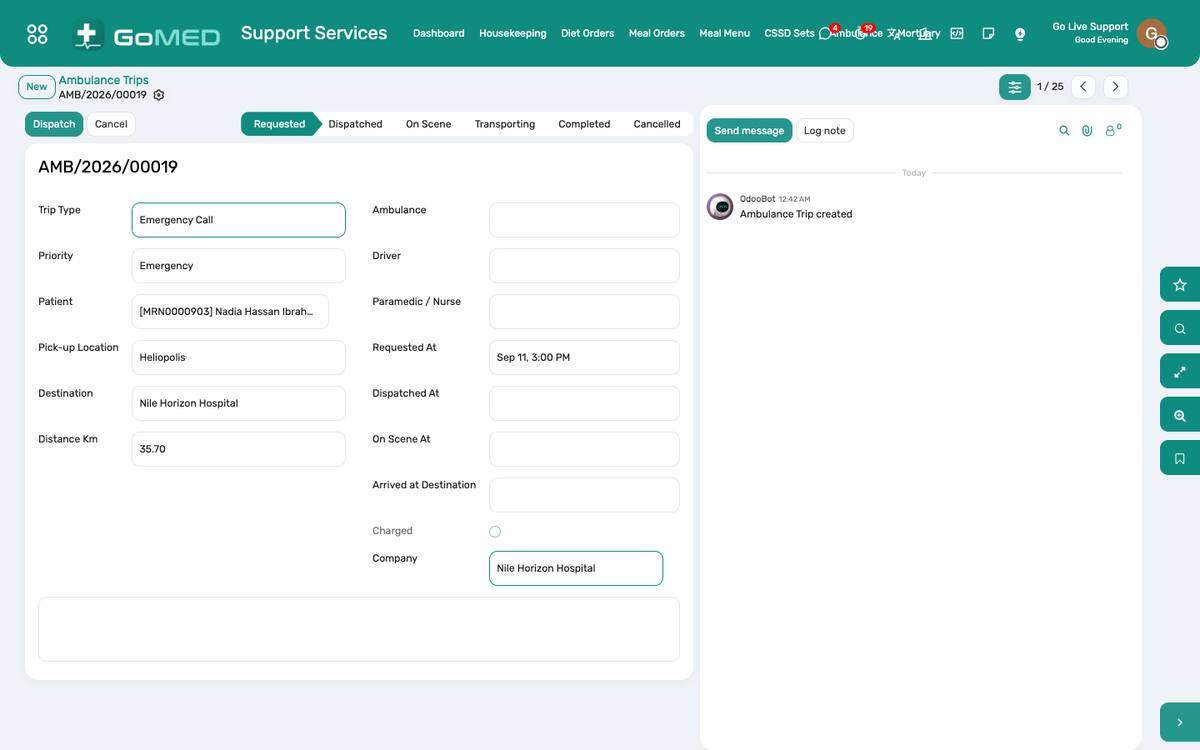
The departments that keep the clinical ones running: ambulance trips with the vehicle and the crew, diet orders per admitted patient feeding the kitchen and the meal menu, housekeeping requests and bed cleaning, sterilisation sets with their cycles, and the mortuary register.
Where:Support Services › Ambulance · Diet Orders · Housekeeping · CSSD Sets · Mortuary
How to
Dispatch an ambulance
- Support Services › Ambulance › New trip: type (emergency, transfer in, transfer out, discharge), patient, pickup and destination, vehicle, crew.
- Dispatched, arrived, completed stamp the times; the trip is charged if billable. With the Traccar integration the vehicle’s position shows live.
Order a diet
- On the admission (or Support Services › Diet Orders): regular, soft, liquid, diabetic, low salt, renal, nil by mouth; allergies pulled from the file.
- The kitchen sees the list per ward and meal; the patient orders dishes allowed by the diet on the portal or the app.
Clean a bed and handle housekeeping requests
- A discharged bed appears under Housekeeping as “to clean”; Done returns it to free on the bed board.
- Spills, waste, linen: Housekeeping › Request; assigned and closed by the supervisor.
Sterilise and issue sets
- CSSD Sets: each instrument set with its contents; a cycle (autoclave, load, indicator result) per sterilisation; issued to a theatre or ward and returned for reprocessing.
Keep the mortuary register
- Mortuary › New on a death: received, the compartment, the release to the family or the authority with identity checked and the time.
See also: Admissions & Bed Board Operation Theatre Purchasing, Stock & Maintenance
Patient Portal
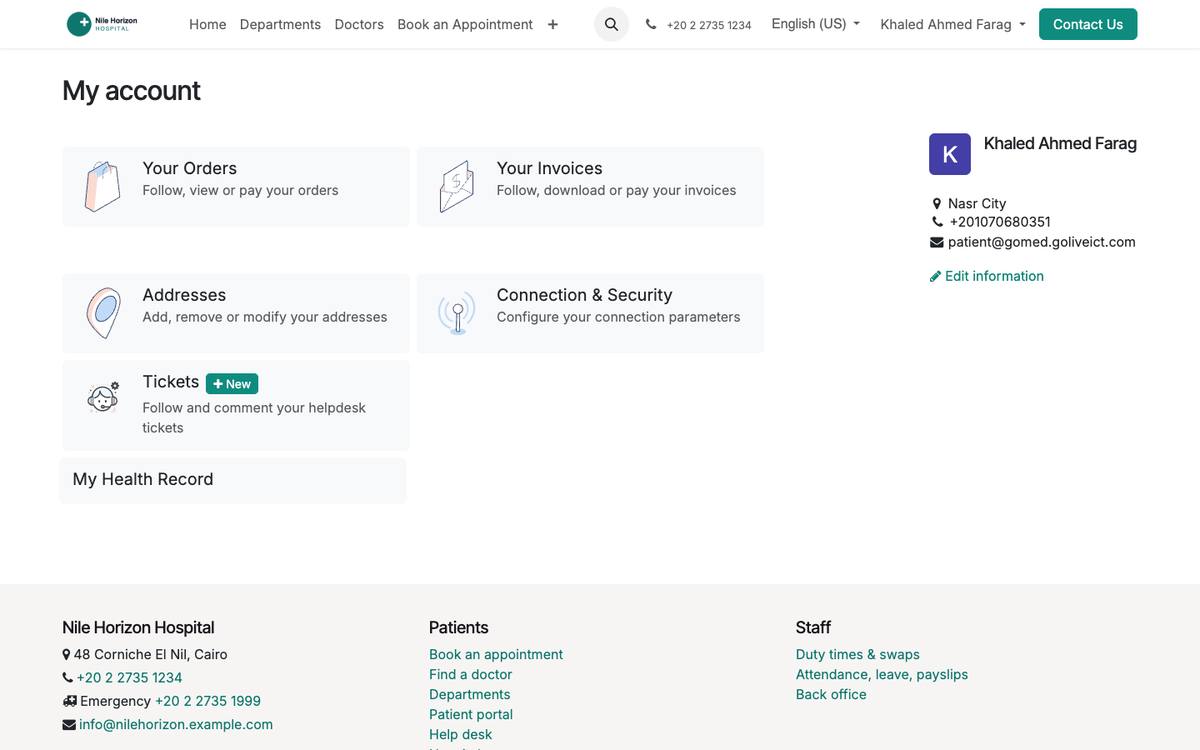
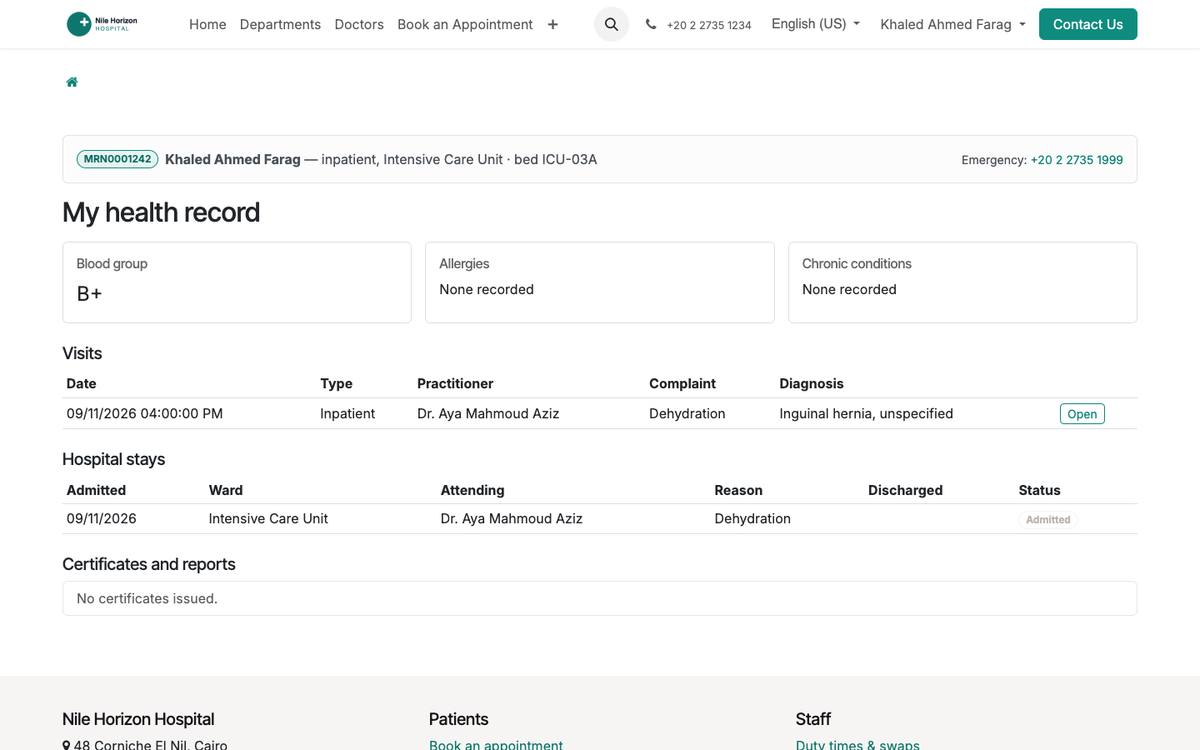
The patient’s own login: appointments, today’s queue and video visit, results with the PDF, prescriptions with dose reminders, bills and receipts, the health record, consents to sign, the vaccination card, the hospital map — and, while admitted, the ward stay, medicines due, meals and a call-for-help button.
Where:https://<hospital>/my · Patient Portal › Portal Requests (staff side)
How to
Give a patient access
- Patient form › Portal tab › Grant portal access (needs an e-mail).
- The patient sets a password from the invitation; the same login works in the mobile app.
Book a visit, a test or a study (patient)
- My Portal › Book a Test, Study or Visit: what is needed, the department or doctor, the preferred date and slot, a note.
- Reception sees it under Patient Portal › Portal Requests and confirms; the patient sees the status and receives the SMS.
Follow today’s queue and join a video visit (patient)
- My Portal › Today: the token, how many are ahead, the estimated wait; the page refreshes itself.
- For a teleconsultation, “Join the video visit” opens the room a few minutes before the time.
Sign a consent (patient)
- My Portal › Consents: the forms the doctor asked to be signed; read, draw the signature, Sign.
- The record shows the signature, the time and the channel.
During a hospital stay (patient)
- My Ward Stay: ward, bed, attending doctor, expected discharge, the operation if any.
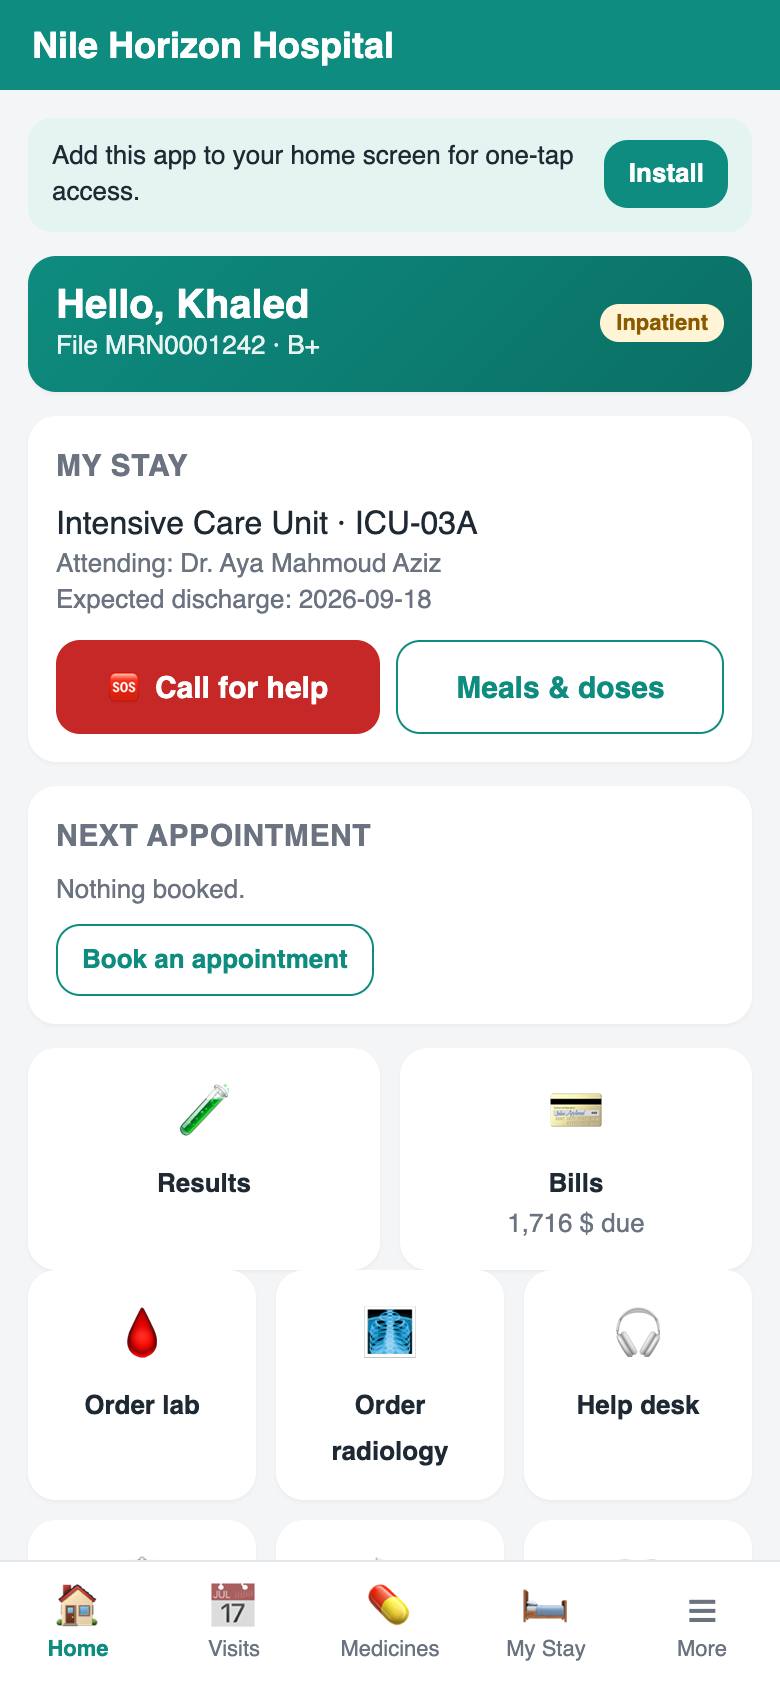
- My medicines: the doses due today; Meals: order dishes allowed by the diet for today or tomorrow; Call for help: the ward’s nurses get the request as a task and a push notification.
Handle portal requests (reception)
- Patient Portal › Portal Requests: new requests by type; open one, book the appointment or the test, or reply to the patient; the state is shown on the portal.
See also: Mobile App (patients and staff) Appointments, Queue & Teleconsultation Certificates & Consents SMS Messages
Mobile App (patients and staff)
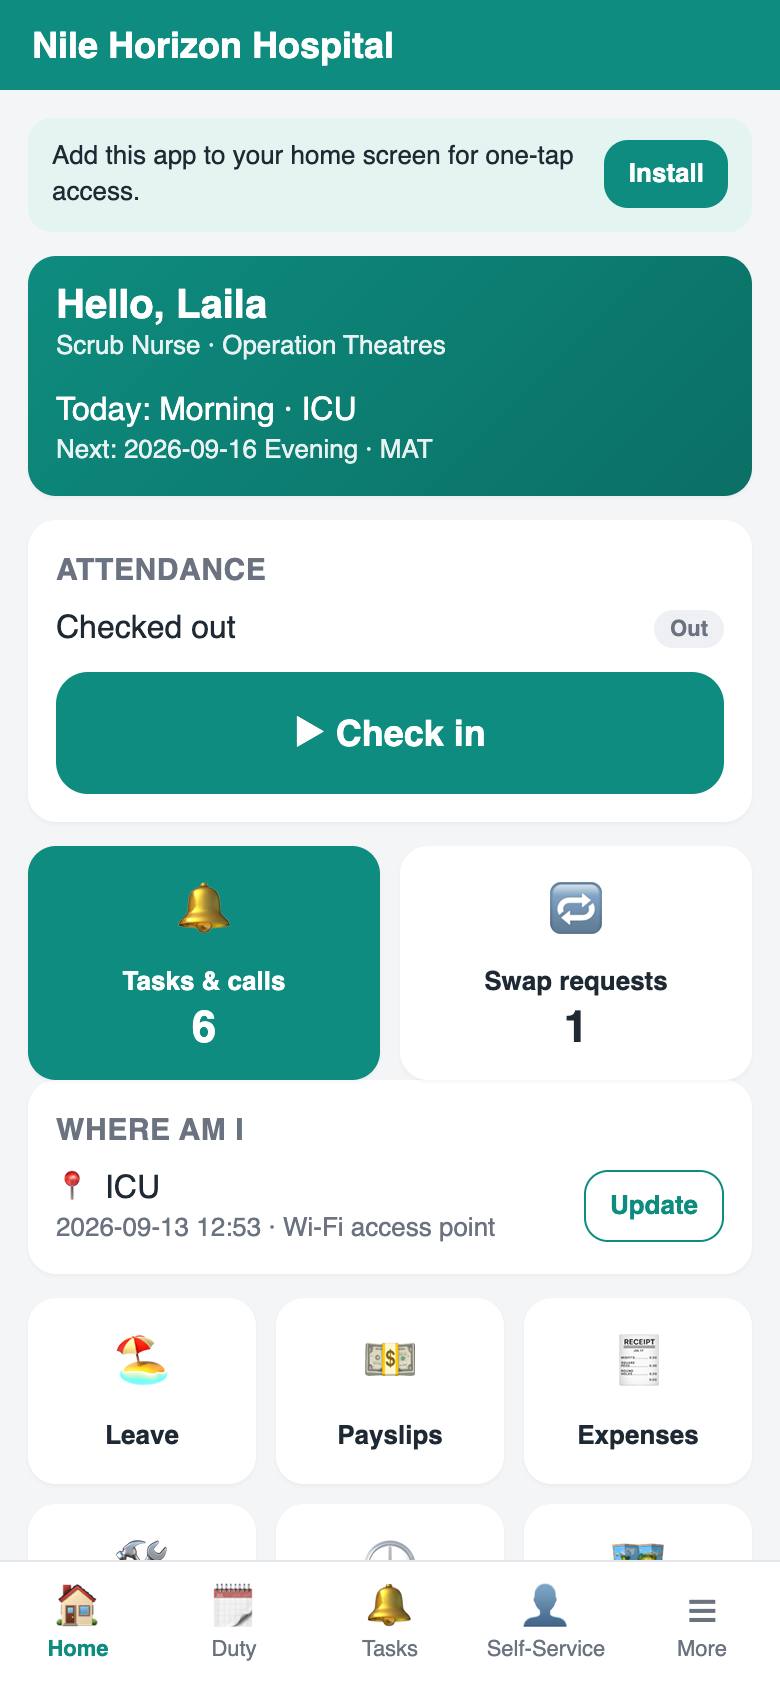
One installable app at /app — no store account, installed from the browser on Android and iPhone. Who signs in decides what it shows: a patient’s care (book, results, medicines, queue, video, consents, vaccinations, bills, meals, call for help) or a staff member’s day (check-in, duties, swaps, tasks, self-service, indoor location). Push notifications; Arabic and English.
Where:https://<hospital>/app · Patients › Configuration › Mobile App
Before you start
- Push
- Patients › Configuration › Settings › Push Notifications: set up at install when the pywebpush package is present; the staff and patients allow notifications the first time.
- Indoor location
- Patients › Configuration › Location Zones: wards, clinics, theatres, offices, each with its Wi-Fi access points or a QR printed at the door.
How to
Install the app on a phone
- Open https://<hospital>/app in the phone’s browser and sign in.
- Android: “Add to Home screen” from the menu; iPhone: Share › Add to Home Screen.
- Allow notifications when asked.
Patient: book, read results, take medicines on time
- Book: a visit, a test or a study from Book; results appear under Results with the PDF; prescriptions under Medicines with dose reminders pushed at the times computed from the frequency.
- Today: the queue position and the Join button for a video visit; Consents: read and sign; Vaccines: the card and the next dose.
Staff: check in, see duties, swap a shift
- Home › Check in / Check out (attendance).
- Duty: the roster for the coming weeks; Ask to swap: choose the colleague and, optionally, the duty taken in exchange; the colleague accepts in their app and the department approves.
- Tasks: the ward’s nursing tasks and calls for help; Done from the phone.
Staff: self-service
- More › Leave (request, balance), Payslips, Expenses (photo of the receipt), Help desk tickets.
Staff: record where you are
- Where I am: pick the zone, or scan the QR at the door; with the Wi-Fi controller feed it is automatic.
- The charge nurse sees the team on the map under Patients › Staff Locations.
See also: Patient Portal Nursing Station & Barcode eMAR Staff, Roster, Attendance & Payroll Help Desk
Hospital Website
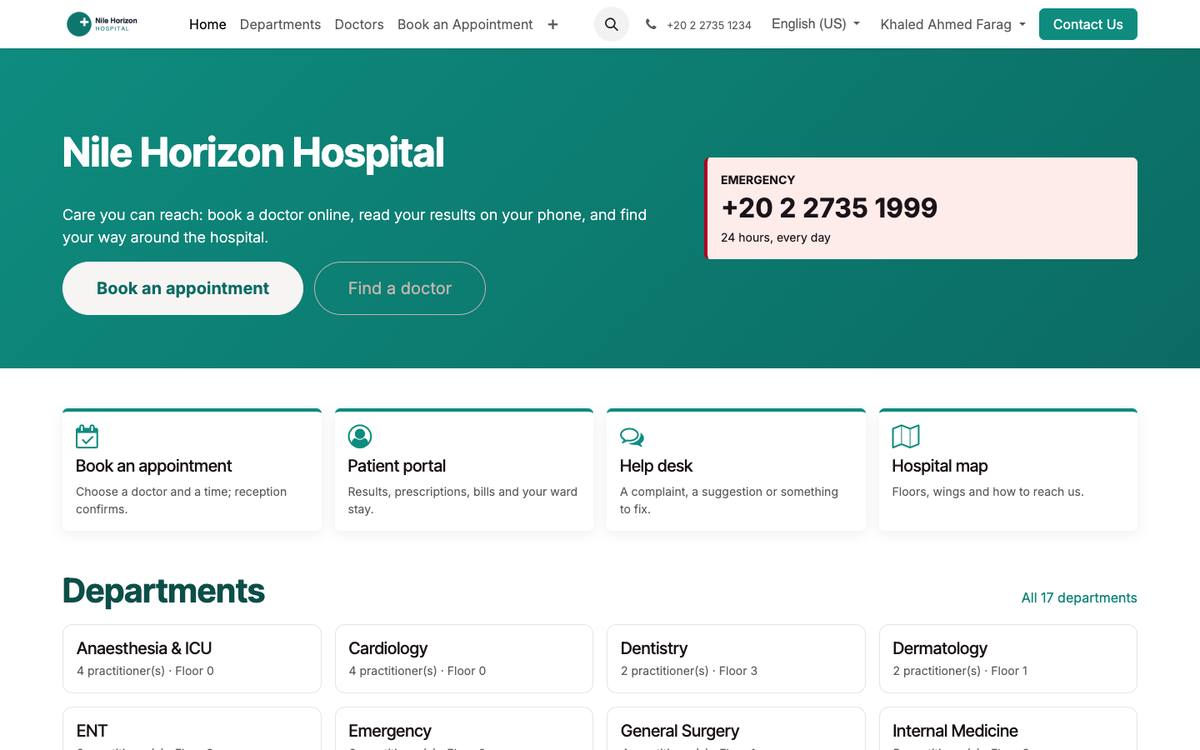
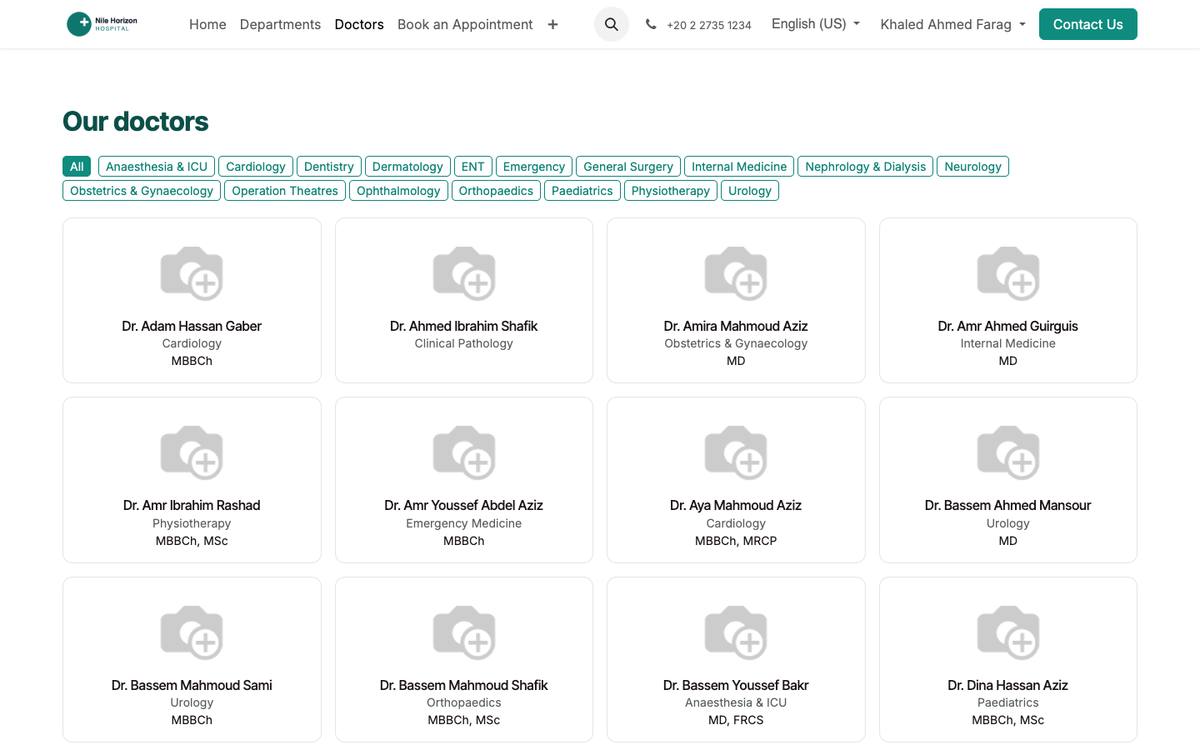
The hospital’s public site, branded from the company record: departments, the doctors’ directory with their schedules, online booking that lands in portal requests, the hospital map and directions, and the pages the hospital writes itself with the website editor.
Where:https://<hospital>/ · Website app
How to
Brand the site
- Settings › Companies: logo, colours, phone, e-mail, address, the emergency number; the site takes them.
- Website › Edit on any page to change texts and pictures with the editor.
Publish departments and doctors
- A department or a practitioner is on the site when Published is ticked on its record; add a photo and a short biography.
Receive online bookings
- /book: the visitor chooses department, doctor, date and leaves their phone; the request appears under Patient Portal › Portal Requests for reception.
Publish the map
- Patients › Configuration › Settings › Hospital map: upload the floor plan and the directions; it shows on /hospital-map, the portal and the app.
See also: Patient Portal Appointments, Queue & Teleconsultation
WhatsApp Assistant
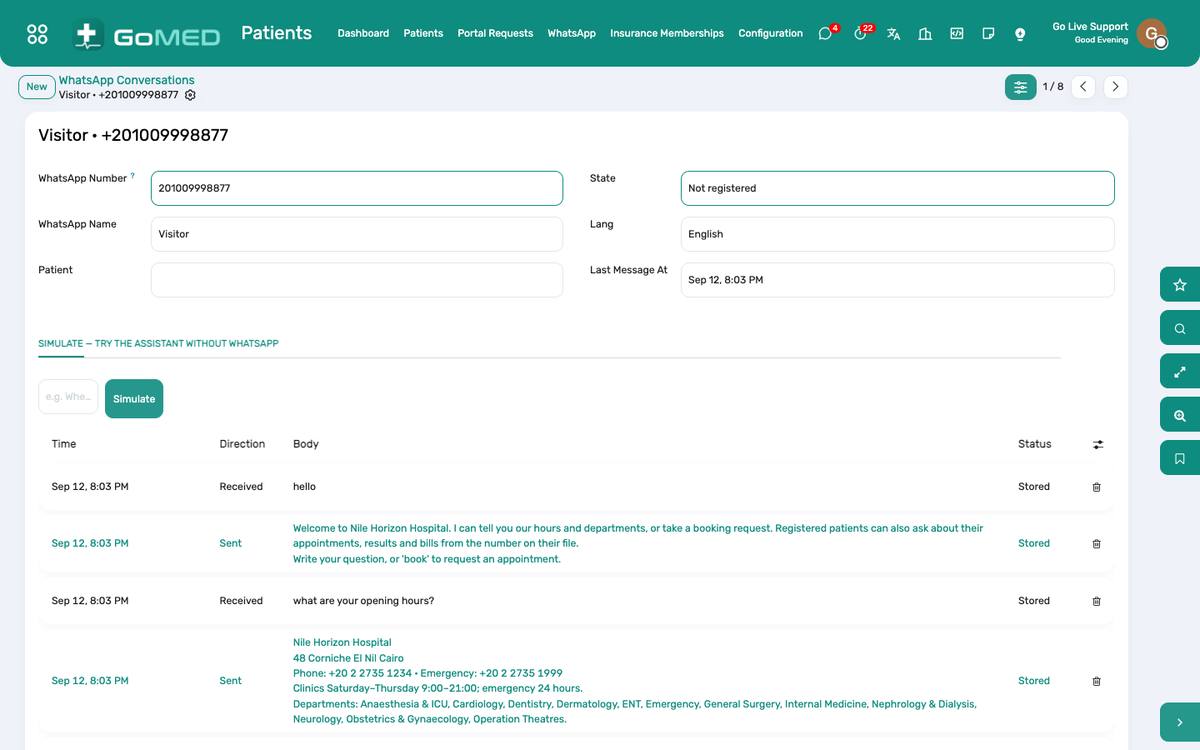
The hospital’s WhatsApp Business number answers patients: verifies them by national ID, replies to appointment, result and bill questions from their own record only, takes booking requests, hands over to the help desk, and stops when asked. Rules in Arabic and English; the AI agent answers what the rules do not.
Where:Patients › WhatsApp · Configuration › Settings › WhatsApp
Before you start
- Meta credentials
- Patients › Configuration › Settings › WhatsApp: the phone number id, the access token and the webhook verify token from the Meta app; the webhook URL is /gomed/whatsapp/webhook.
How to
Read and take over a conversation
- Patients › WhatsApp: conversations with the patient identified, the last messages and whether the assistant or a person is answering.
- Take over: your replies go out on the number; Hand back returns it to the assistant.
Simulate before going live
- Patients › WhatsApp › Simulate: type as a patient would; see the verification, the answers and the hand-offs without a live number.
See also: SMS Messages Help Desk Dashboards, Reports & AI Assistant
Help Desk
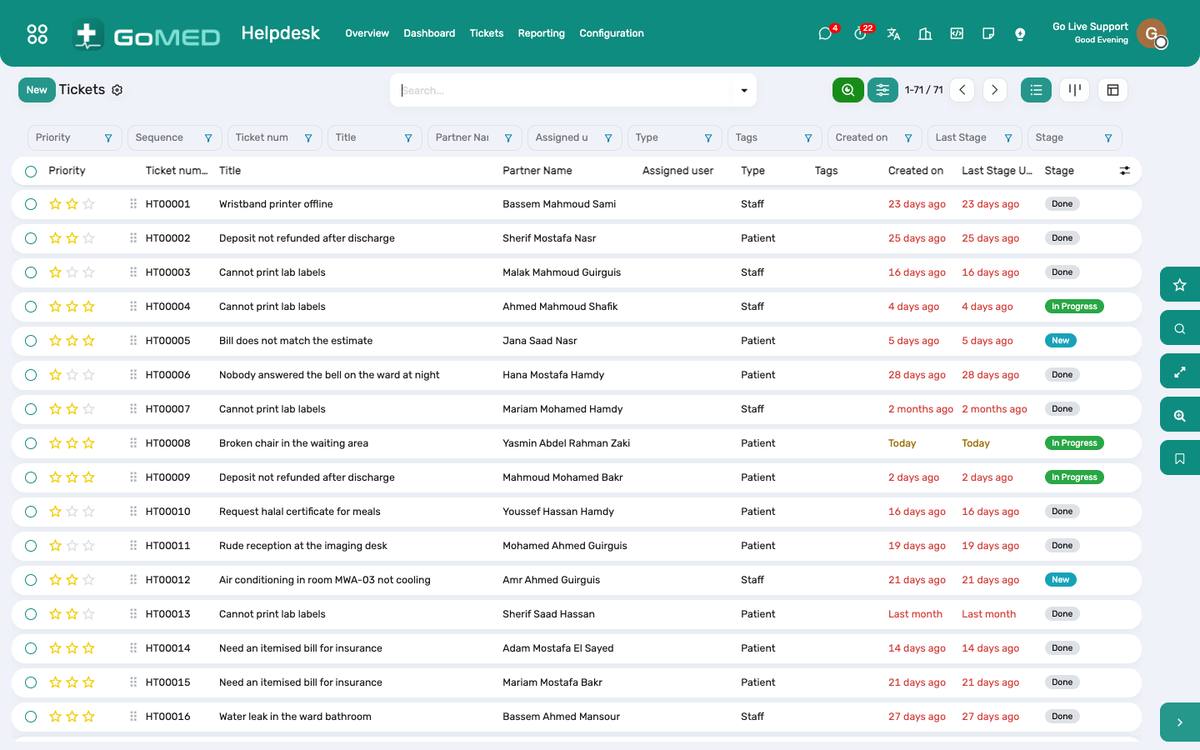
Complaints, suggestions and requests from patients (portal, app, WhatsApp) and staff (app, back office), with teams, SLA targets, stages and a hand-off to the Maintenance app for anything that needs a technician.
Where:Help Desk › Tickets
How to
Log and work a ticket
- Help Desk › Tickets › New (or it arrives from the portal, the app or WhatsApp): the person, the type, the description; assign a team.
- Move it through the stages; reply from the chatter (the patient sees replies on the portal and in the app); close with the resolution.
Send a ticket to maintenance
- On the ticket, Create maintenance request: the equipment or the location, the priority; the technician works it in Maintenance and the ticket closes when it is done.
Watch the SLA
- Help Desk › Dashboard: open tickets, breached SLAs, satisfaction; per team and per type.
See also: Patient Portal Mobile App (patients and staff) Purchasing, Stock & Maintenance
Staff, Roster, Attendance & Payroll
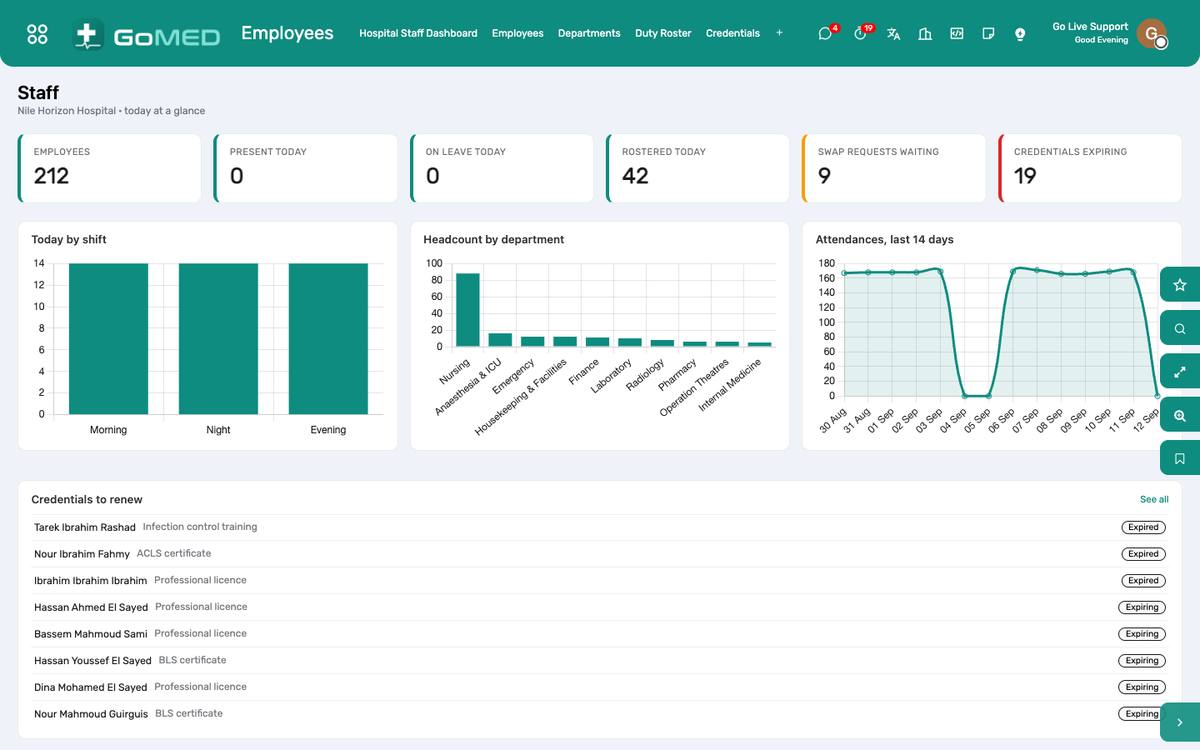
Employees with credentials and licences, the duty roster per ward and shift, attendance from biometric devices or the app, leave with allocations and approvals, payroll with the Egyptian rules, expenses, recruitment and the staff self-service on the portal and the app.
Where:Employees · Practitioners › Duty Roster · Attendances · Time Off · Payroll · Expenses · Recruitment
How to
Plan the duty roster
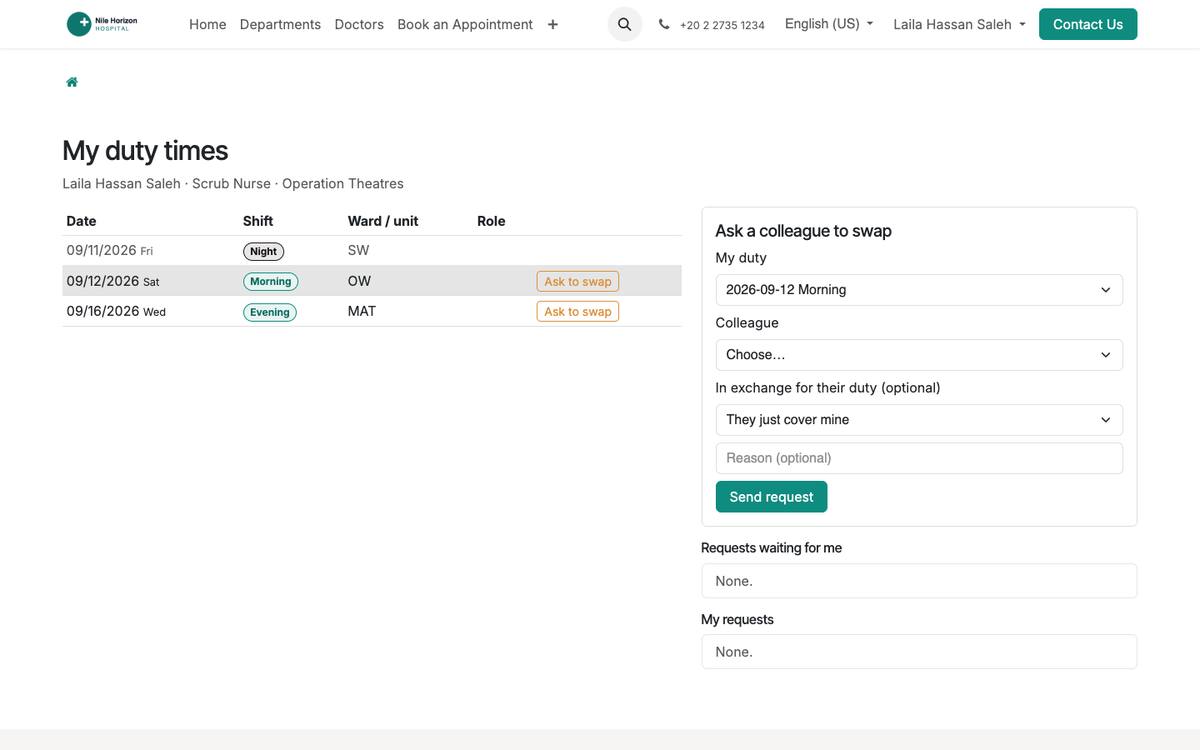
- Practitioners › Duty Roster: the ward, the period; assign nurses and doctors to shifts (morning, evening, night) per day.
- Publish; staff see their duties on the portal and the app.
- Swap requests from the app arrive under Patient Portal › Duty Swaps: the colleague accepts, the department head approves, the roster updates.
Record attendance
- Biometric devices feed Attendances automatically; the app’s check-in does the same.
- Late arrivals and absences are computed against the schedule for payroll.
Manage leave
- Time Off › Allocations per leave type and year; requests from staff (portal, app, back office) go to the manager for approval; balances show on the payslip.
Run payroll
- Payroll › Payslip batches per month: work entries from attendance and leave, the salary structure with the Egyptian tax and insurance rules, doctor fee statements as inputs.
- Validate the batch; post to accounting; payslips reach the staff on the portal and the app.
Track credentials
- Practitioners › Credentials: licences and certifications with expiry; the dashboard warns 60 days ahead.
See also: Practitioners, Departments & Services Mobile App (patients and staff) Pre-authorisation, Claims & Doctor Fees
Purchasing, Stock & Maintenance
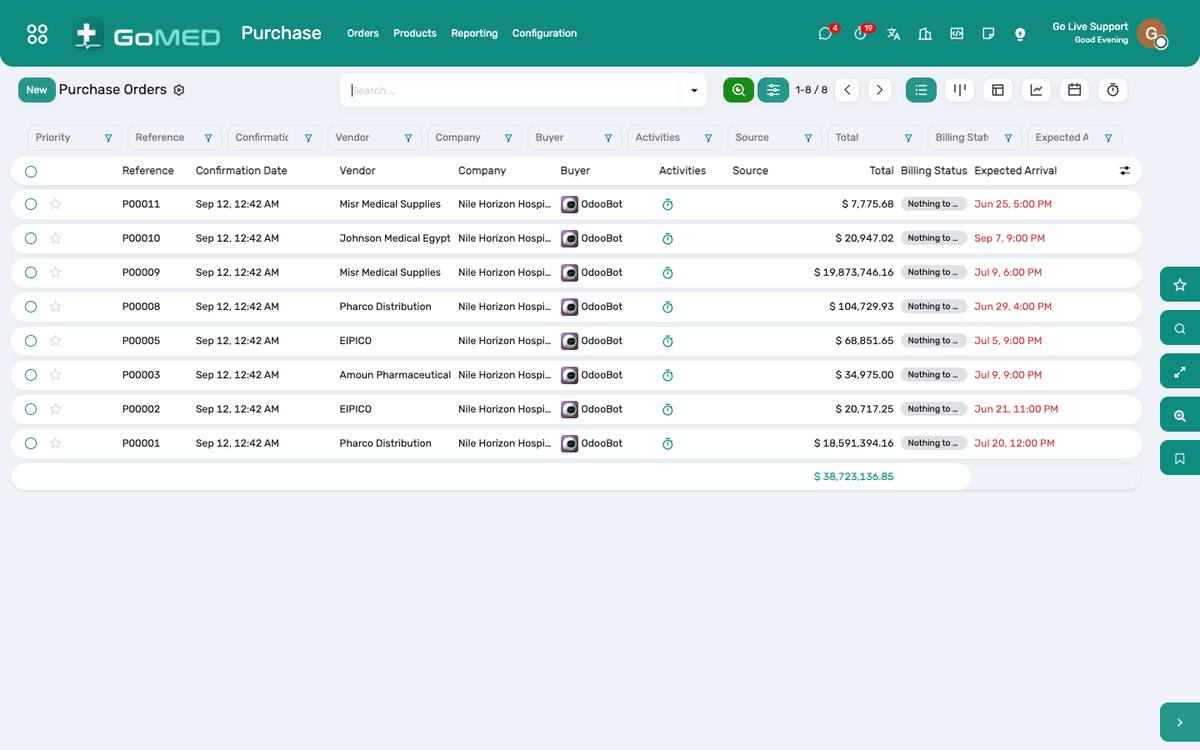
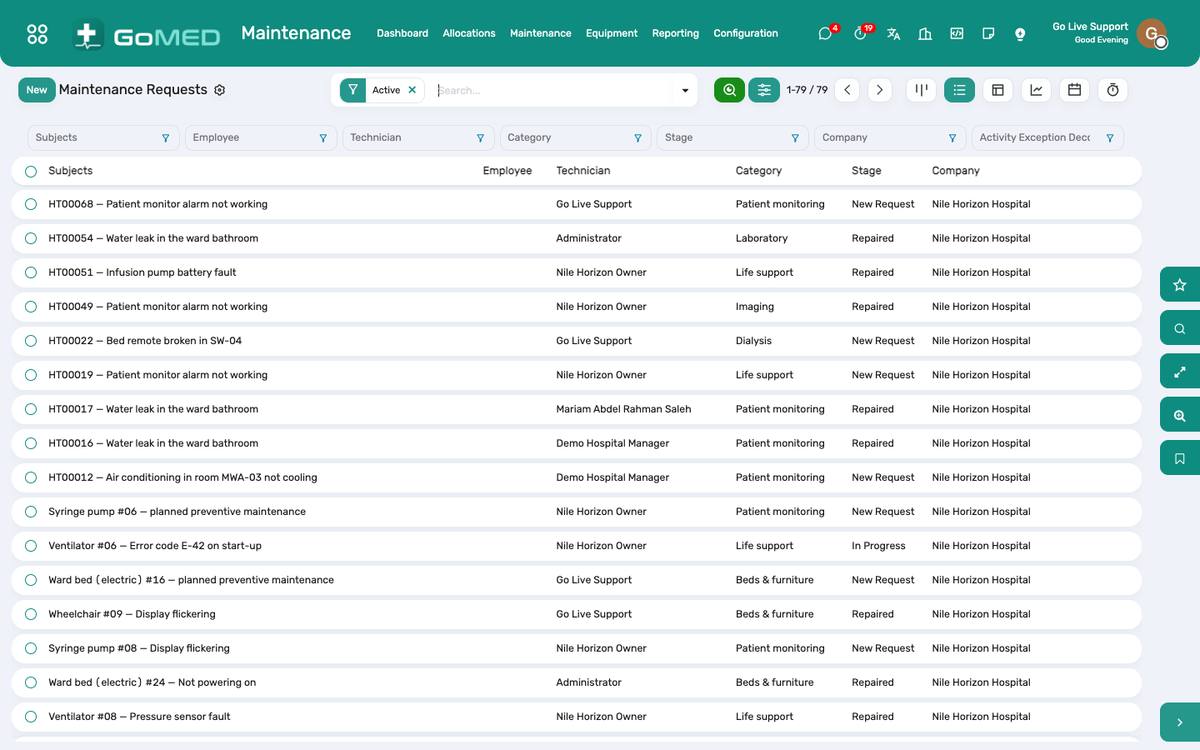
Requisitions from departments, requests for quotation and purchase orders, receipts with batches and expiry into the main store, transfers to pharmacies and wards, stock counts; biomedical equipment with preventive maintenance schedules and corrective requests; the vehicle fleet.
Where:Purchasing · Inventory · Maintenance · Fleet
How to
Buy for a department
- Purchasing › Requisitions: the department lists what it needs; approved requisitions become RFQs to vendors, then purchase orders.
- Receive against the order in Inventory › Receipts with batch and expiry; the store’s stock updates; the vendor bill is matched to the receipt.
Move stock to a pharmacy or a ward
- Inventory › Transfers: from the main store to the location; ward requisitions from the Pharmacy app create them.
- Count a location: Inventory › Physical Inventory; the difference is posted.
Maintain equipment
- Maintenance › Equipment: every device with its serial, department, vendor, warranty and the preventive plan (interval); the calendar shows what is due.
- Corrective: a request from the ward, the help desk or the app; the technician records the work, parts and downtime; the equipment’s history is the basis of replacement decisions.
See also: Pharmacy & Dispensing Help Desk Ambulance, Diet, Housekeeping, CSSD & Mortuary
Settings, Roles & Users
Users and their roles (reception, nurse, doctor, pharmacist, laboratory, radiology, cashier, billing, medical records, quality, manager), the company record the documents print from, the hospital-wide settings under Patients › Configuration › Settings, and the audit of who changed what.
Where:Settings › Users · Companies · Patients › Configuration › Settings
How to
Create a user with a role
- Settings › Users › New: name, e-mail (the login); tick the GoMed role — each role sets the access to every app at once.
- Link the practitioner (for doctors) or the employee (for staff self-service).
- Send the invitation; the user sets a password from the e-mail.
Set the hospital-wide options
- Patients › Configuration › Settings: MRN format, prescription validity, the laboratory billing gate, SMS gateway, video server, identity and legal documents (card colour, Hijri dates), WhatsApp, push notifications, the hospital map.
Keep the company record right
- Settings › Companies: name in both languages, logo, address, phone, the emergency number, tax id — every printed document reads them.
Support access
- GoMed support never has a password to your database. When you ask for help, a single-use link is issued for a named operator, expires in minutes, and the visit is recorded under Settings › Support Access where you can read it.
See also: Signing in and finding your way Practitioners, Departments & Services
Dashboards, Reports & AI Assistant
Every app has a dashboard; the hospital dashboard brings the day together — visits, admissions, occupancy, theatre, revenue, collections, claims, incidents. Pivot and graph views on every list answer the next question; the AI assistant answers in words from the same data.
Where:Dashboards · any list › pivot / graph · AI Assistant
How to
Read the hospital dashboard
- Dashboards › Hospital: the numbers of the day, the charts of the fortnight and the lists that need attention; every card opens its list.
- Change the period with the filter; compare departments with the group-by.
Build a report from a list
- On any list switch to Pivot: choose rows, columns and measures (count, amounts); expand headers; download to Excel.
- Graph: bar, line or pie of the same; Favourites › Save as dashboard to keep it.
Ask the AI assistant
- AI Assistant › New conversation: “How many admissions last month by ward?”, “Which claims are rejected and why?”; the answer cites the records and opens them.
- It reads only what your role can read.
See also: Signing in and finding your way Bills, Charges & Cashier